As both a GIS professional and digital nomad, being able to geotag photos is critical to staying organized. With travel photography, you need to be able to search by both date and location, at the very least. But believe it or not, I’ve never owned a camera with a built-in GPS. Today, I want to teach you how to geotag your photos in Adobe Lightroom without having a built-in GPS. And best of all, this method is infinitely scalable. It requires just one GPS and the same minimal effort regardless if you’re shooting with one camera or a thousand.
An Introduction to the Lightroom Map Area
Adobe Lightroom comes with a really nice map interface to browse, explore, and view your photos. Unfortunately, if your photos aren’t geotagged, the feature is worthless.
Lightroom’s map feature lets you browse, explore, and view your photos and videos on an interactive map. You can also easily edit and geotag your photos from the map, as well as create collections, tag keywords, and much more.
Are You One of the Many Travel Photographers Struggling to Geotag Your Photos in Lightroom Without a Built-in GPS?
If your photos and videos are already geotagged when you import them into Lightroom, the map gets set up automatically. However, many cameras still don’t have built-in GPS. You can buy a GPS adaptor to mount to the top of your camera, but they come with plenty of drawbacks. First, with a GPS mounted to the top of your camera, you won’t be able to mount a flash or a mic there. And what if you have multiple cameras? At $200-300 a pop, the cost of outfitting each camera with a GPS unit can snowball out of control incredibly fast.
Alternatively, you can use a smartphone app that your camera manufacturer makes. When you snap a picture, the app uses the GPS in your phone to record the location and sends it to your camera over bluetooth. While I have not used these apps much, be aware that smartphones usually disable the GPS when it’s not actively in use to conserve battery. Unfortunately, if you phone’s GPS goes into standby or sleep mode during a photo shoot, it will often send the last location the GPS registered, which may not necessarily be your current location. As a result, many people have complained that these apps are not accurate or reliable for geotagging photos and videos.
So where do you go from here? This is where my method comes in. This method is by no means anything bleeding edge or earth-shattering. In fact, a quick Google search will reveal that it’s widely used throughout the photography and filmmaking industries. And best of all, it only requires one GPS regardless of how many cameras you have. However, there are still a few places it can trip you up. As a result, I want to use my background in GIS and data science to make sure that you fully understand both what the data is and what you’re doing with it. You unfortunately won’t find that in many other tutorials.
How to Use Handheld GPS (or Smartphone) to Geotag Your Photos and Videos in Adobe Lightroom
The strategy to geotag photos in Adobe Lightroom without a built-in GPS is staggeringly simple. While you’re out on your photo or video shoot, use a handheld GPS to record your movement. Then, in post-production match the timestamp on the GPS track to the timestamp on your camera to get the latitude and longitude coordinates for the geotag. Once you add the latitude and longitude to the metadata, Lightroom will automatically look up and add the city, state/province, and country that correspond to those coordinates.
Software You’ll Need
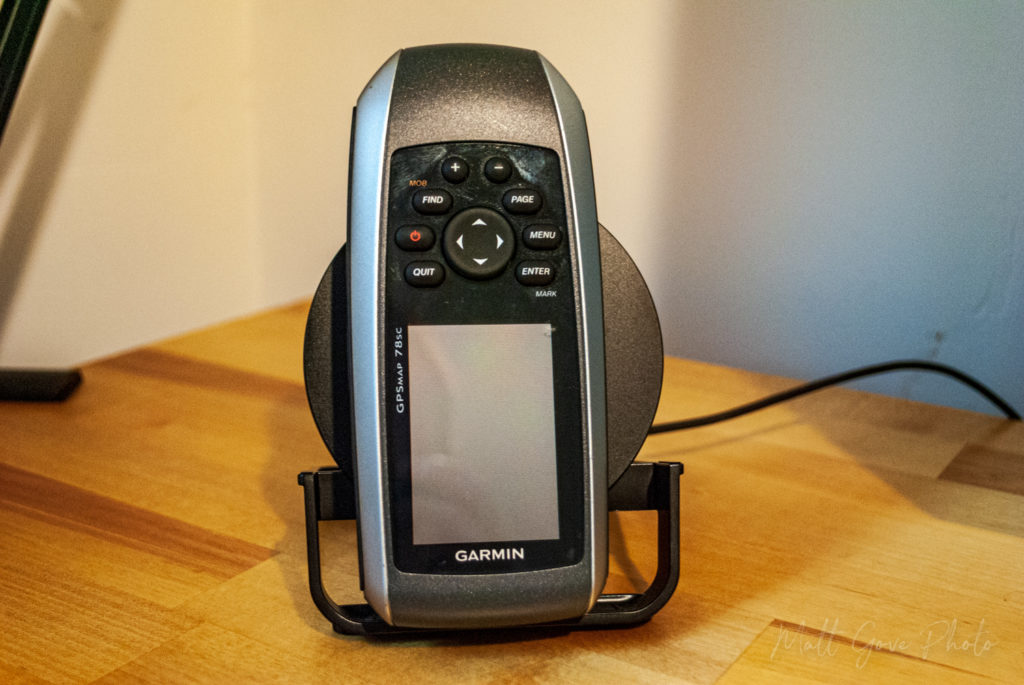
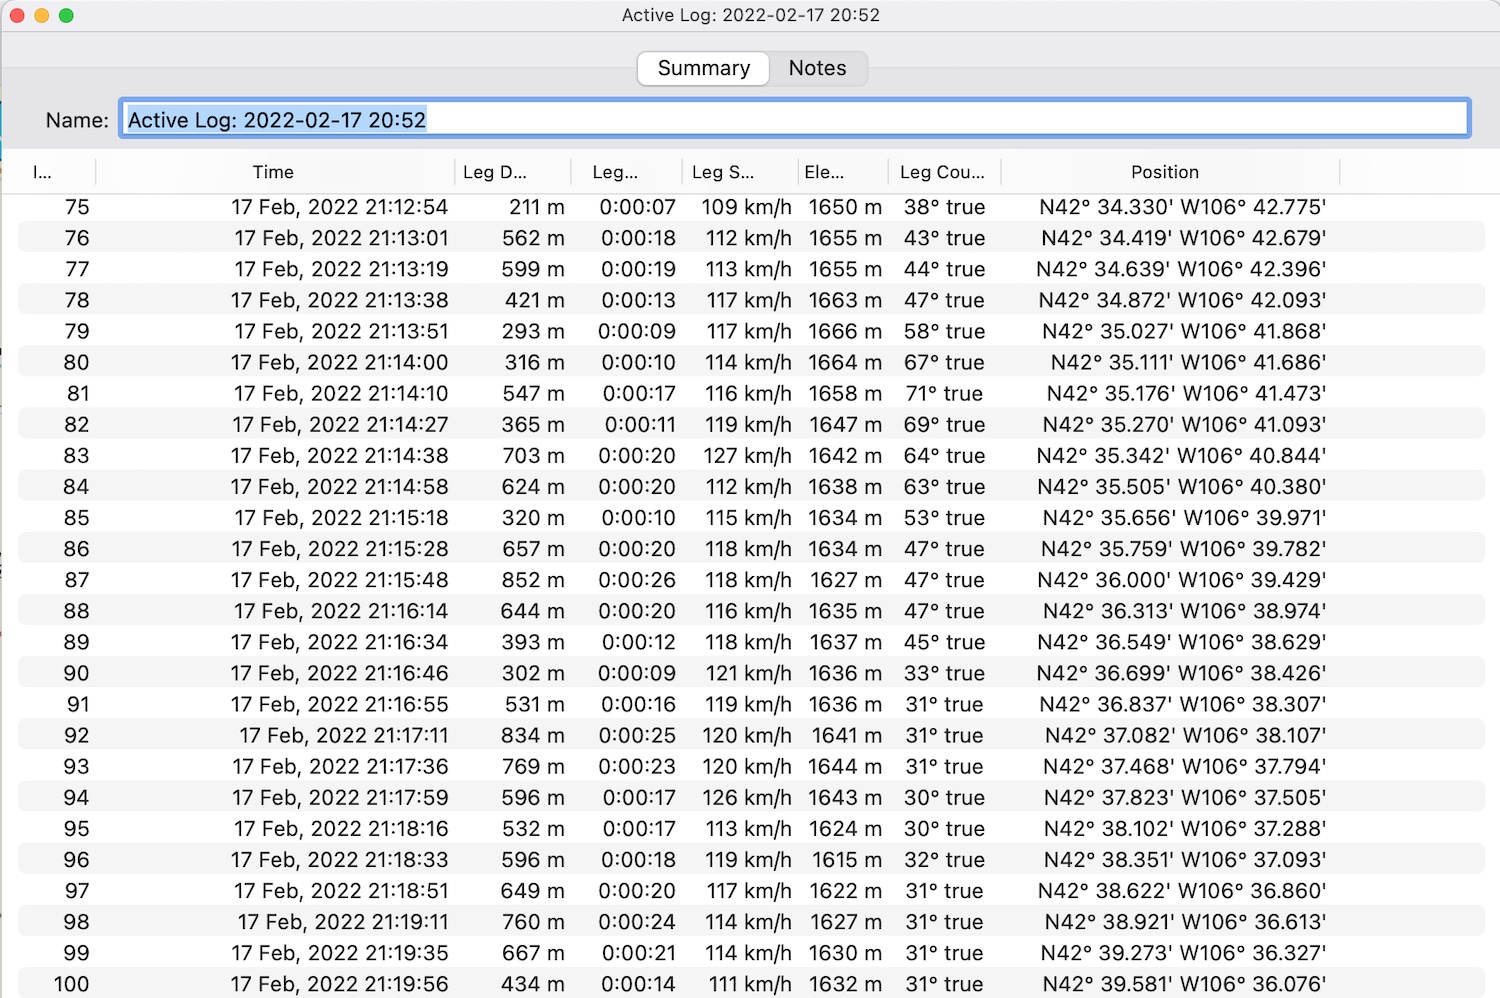
The only software you need to geotag your photos without a built-in GPS is Adobe Lightroom itself. Additionally, depending on what GPS and computer models you’re using, you may need additional software to pull the track off the GPS. If you have a Garmin GPS, don’t worry. All of their software is available free of charge. For example, my handheld GPS uses Garmin’s Basecamp software to offload the track data. On the other hand, the GPS I use in the car mounts like an external hard drive, so I can copy the track to my local disk using the Finder or File Explorer.
The track files you pull off your GPS are stored in GPS Exchange, or GPX format. GPX is an open source, non-proprietary file that stores GPS data for software applications. Data is stored in XML format, which is light-weight and usable in both desktop and web-based applications. In addition to latitude/longitude coordinates and timestamps, GPX files can also store speed, elevation, waypoints, routes, points of interest, and much more.
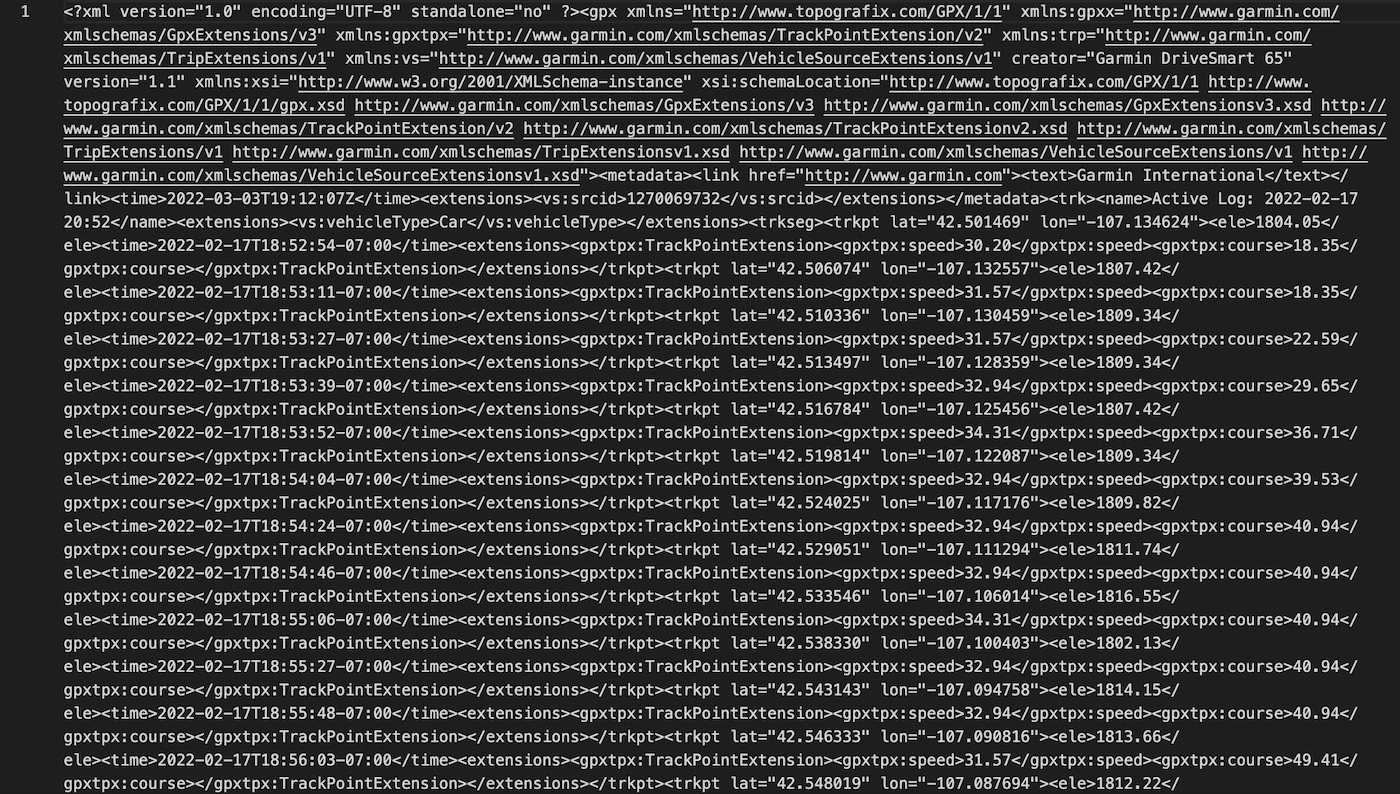
You can view GPX files in numerous desktop and web-based applications, ranging from Google Maps to QGIS and ArcMap to even the Matt Gove Photo maps. However, for the purpose of geotagging photos, the easiest application to view your GPX files is actually Lightroom. You can preview your track right in the Lightroom map before you geotag your photos.
Sync the Clocks on Your GPS and Camera Before You Head Out in the Field
Before you head out for your shoot, your single most important task is to sync the clocks between your handheld GPS and each camera you’ll be using. If the clocks are not synced, your photos and videos will not be geotagged in the correct location.
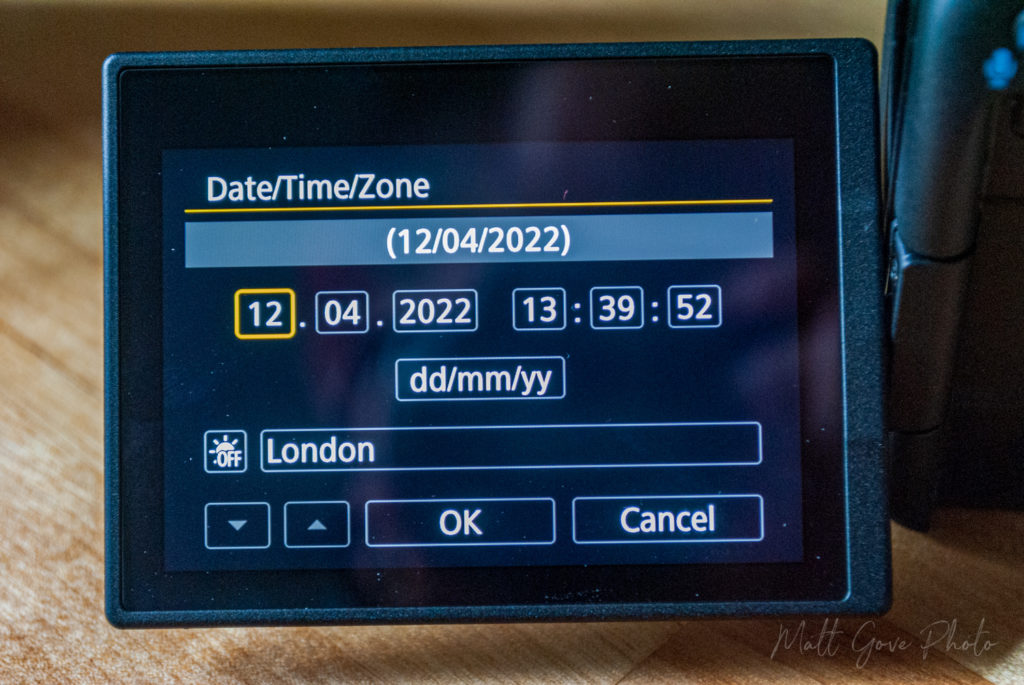
If your travels keep you confined to a single time zone, feel free to sync everything to your local time zone. However, if your travels take you across multiple time zones, you should sync all of your devices to UTC. Also called Zulu Time, UTC is the modern standard that the world uses to regulate time. It differs from Greenwich Mean Time (GMT), as GMT is based on the Earth’s rotation, while the more accurate UTC is based on the atomic measurements.
If your camera or GPS does not offer UTC as a time zone, set it to London (make sure daylight savings is off) or Iceland. In addition, Dakar, the capital of Senegal, is on UTC year-round.
| Time Zone | Winter Offset | Summer Offset |
|---|---|---|
| Newfoundland | UTC – 3:30 | UTC – 2:30 |
| Atlantic | UTC – 4 | UTC – 3 |
| Eastern | UTC – 5 | UTC – 4 |
| Central | UTC – 6 | UTC – 5 |
| Mountain | UTC – 7 | UTC – 6 |
| Pacific | UTC – 8 | UTC – 7 |
| Alaska | UTC – 9 | UTC – 8 |
| Hawaii | UTC – 10 | UTC – 10 |
Once you get out in the field where you’ll be shooting, simply turn on your handheld GPS and throw it in your bag, or put it somewhere that will be out of the way, but with you all day. Make sure the batteries are all charged at the beginning of the day. Finally, don’t forget to carry a spare set of batteries if you’re expecting a lengthy shoot.
Add Location Data in Post-Production in Adobe Lightroom
Now that your shoot is finished, it’s time to geotag your photos and videos in Lightroom. Before we get started, though, there’s another important note about time zones that if not done correctly, will result in your photos not being geotagged correctly.
A Word of Caution About Time Zones in GPX Data vs EXIF Camera Metadata
If you’ve synced your GPS and cameras to UTC, be aware of the difference in how GPX files handle time zones vs the camera’s EXIF metadata. GPX files have the time zone embedded in them. EXIF metadata records the time in the time zone that your camera is set to, but does not actually record the time zone itself in the metadata. In other words, the GPX file sees the time stamp as “2022-04-11 15:21 UTC”, while the EXIF metadata in the camera only sees “2022-04-11 15:21”.
Why is this important, you ask? Because when you offload the GPX file to your computer, your computer automatically converts its timestamp back to local time. For example, let’s say I’m on the east coast of the US, which is 4 hours behind UTC. The computer all of a sudden now sees the GPX timestamp as “2022-04-11 11:21 EDT”, while it still sees the EXIF metadata as “2022-04-11 15:21” (which it incorrectly assumes is also EDT because the EXIF data does not include the time zone). If you try to sync your photos to the GPX track, they’ll all be four hours off!
Thankfully, re-aligning the time zones is incredibly easy in Adobe Lightroom. When you load the GPX file into Lightroom, it will ask you if you want to correct the time zone. If you’ve synced your cameras to UTC, simply take the UTC offset of your local timezone and reverse the sign. For example, if you’re on the US east coast, which is UTC-4, set the time zone correction to +4 hours. This tells Lightroom to add 4 hours to the “2022-04-11 11:21 EDT” GPX timestamp, syncing it back up with the “2022-04-11 15:21” timestamp on the camera.
Still confused? If you don’t want to deal with having to adjust timezones in Lightroom, there’s an easy alternative. Simply set your computer’s time zone to UTC before you import anything into Lightroom. Once you’re finished geotagging your photos, set the time zone on your computer back to local time.
Import the GPX File and the Photos and Videos From Your Shoot into Lightroom
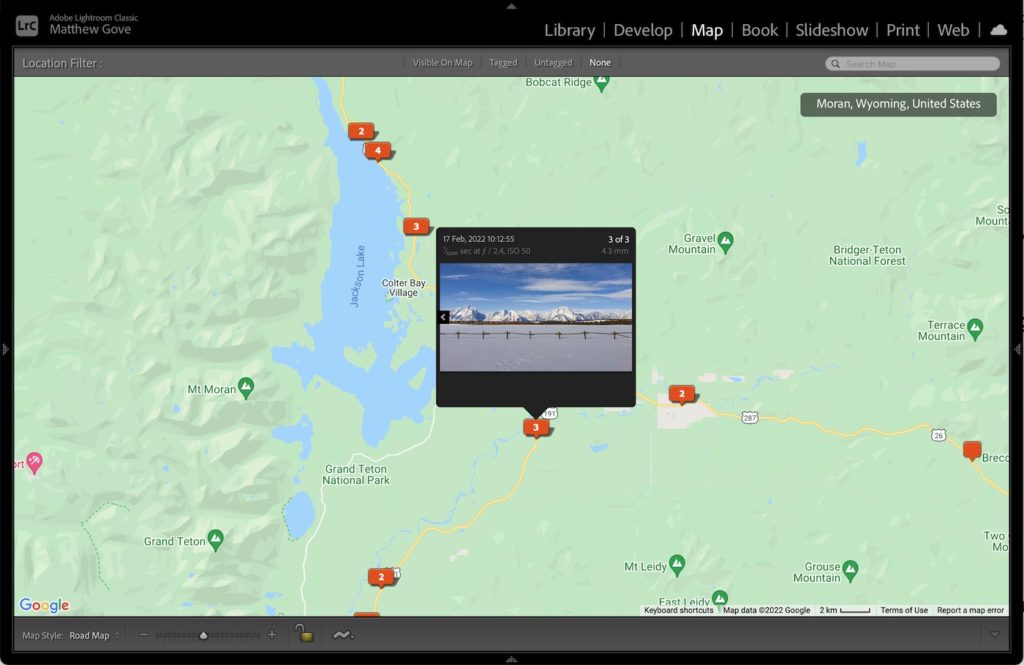
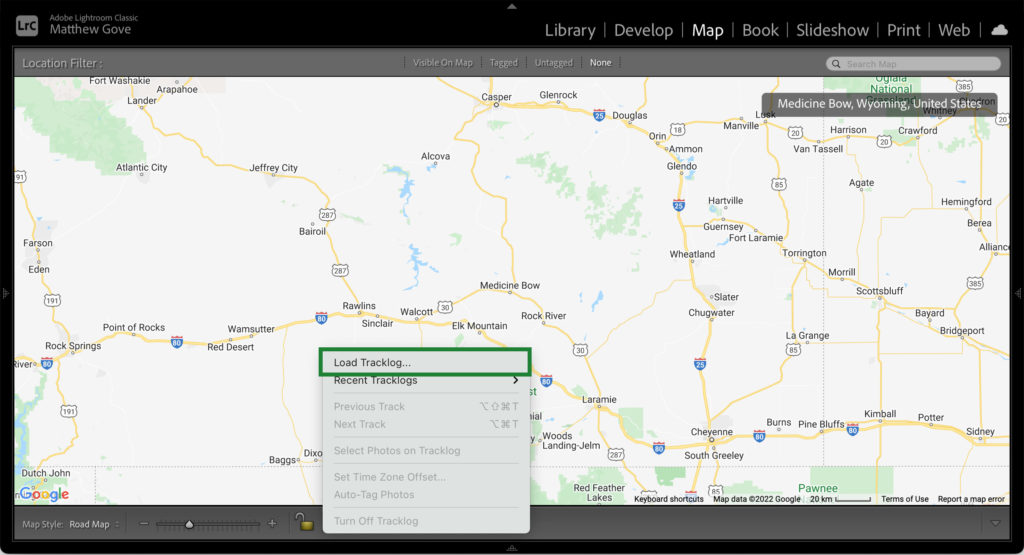
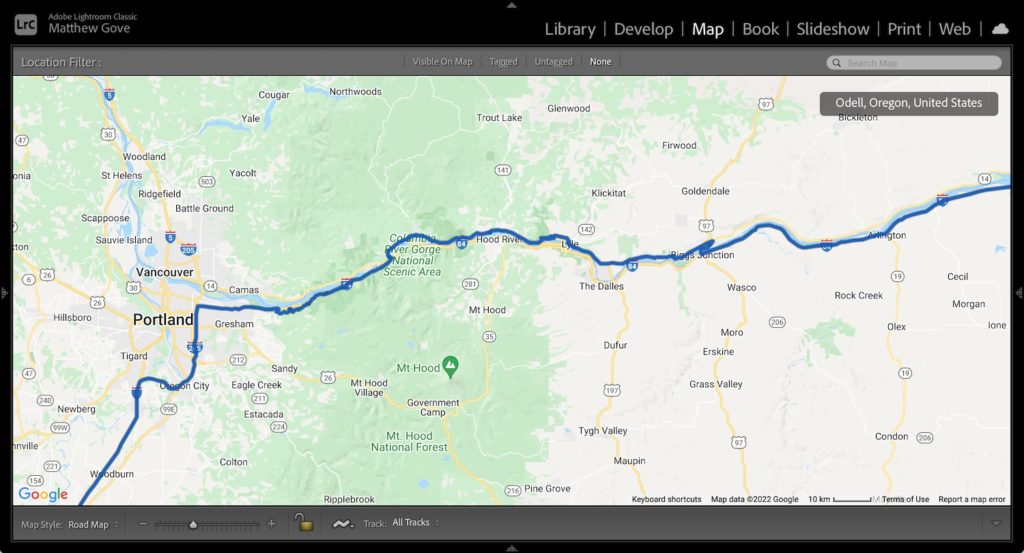
To import the GPX File into Lightroom, first open the map viewer. At the bottom of the window, you’ll see a bar to select the map style, a zoom slider, a lock, and a track button, which is circled in green below.

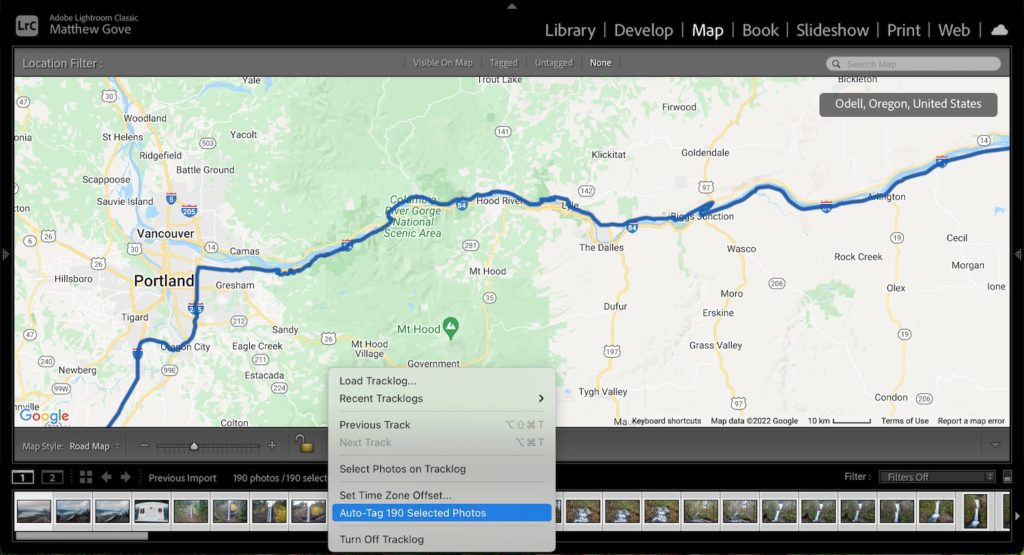
Click the track button and select “Load Tracklog” at the very top of the menu. Navigate to the tracklogs you just pulled off your GPS. Click OK to load them into Lightroom.
Now, you’ll set the time zone offset as we discussed in the previous section. If you’re working in your local time zone (or have set your computer’s time zone to UTC to match the camera and GPS), you don’t need to add any offset to the track. Remember, if you synced the camera and GPS to UTC, simply take the UTC offset of your local time zone and flip the sign. In other words, set the offset to +4 hours for Eastern Time (UTC-4) or +7 hours for Pacific Time (UTC-7). Click OK to confirm the time zone offset.
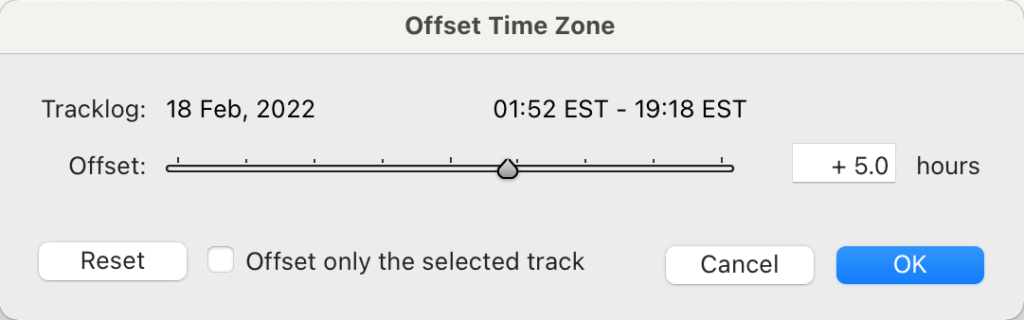
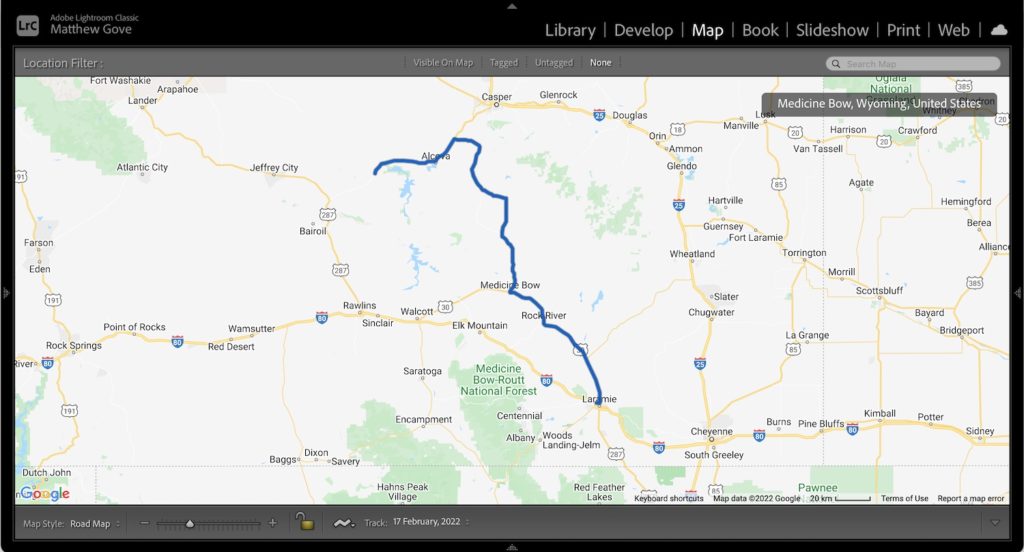
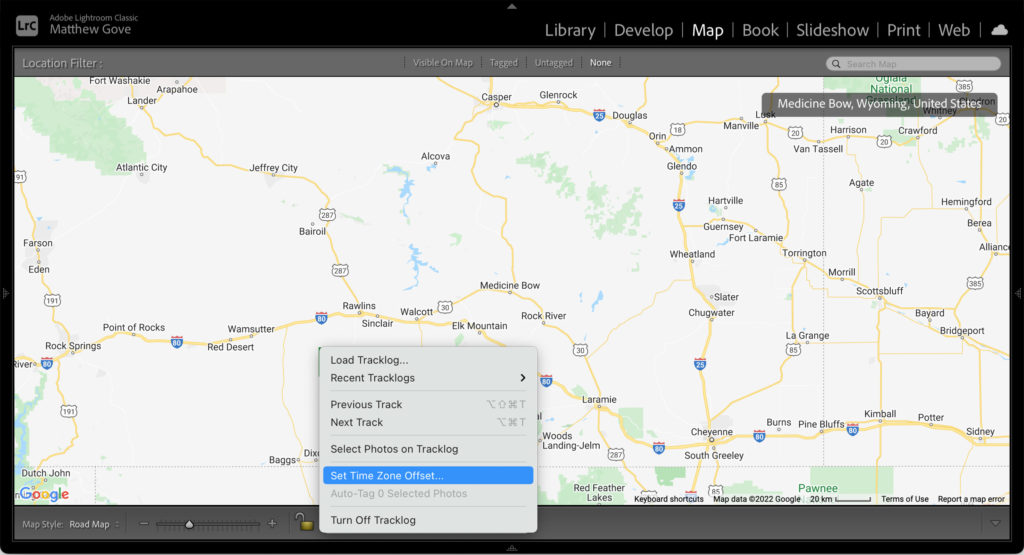
You should see the trackline from your adventure appear on the map. Do note that if Lightroom detects that your tracklog time zone does not appear to match the time zone of your photos, it will highlight the trackline log time in red. In that case, click the track button at the bottom and select “Set Time Zone Offset” to set the correct time zone.
Once you’ve confirmed that the track loaded correctly, then import your photos and videos just like you always have.
Geotag Your Photos in Lightroom with the Click of a Button
Now that both the track and your media are all in place, it’s time to geotag them in Lightroom. In the filmstrip at the bottom of the window, select the photos and videos you want to geotag. Then, click on the track button once again, and select “Auto-Tag XX Selected Photos”, where XX is the number of photos you selected.
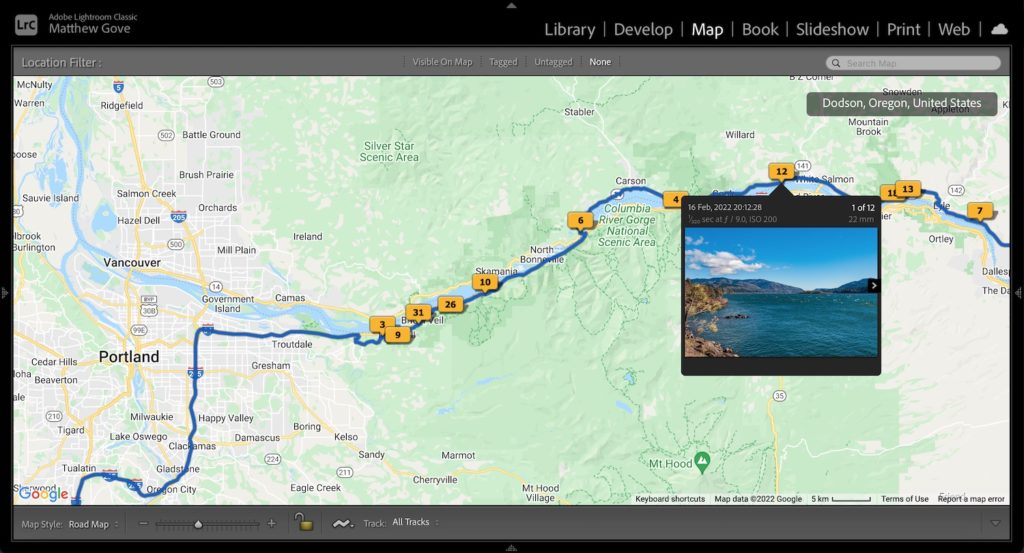
You should see a bunch of points appear on your trackline. Hover over them and you’ll see your photos. If they’re not quite in the right position, you can drag them around to put them in the right place.
Don’t Have a Handheld GPS? Use a Smartphone Instead.
If you don’t have a handheld GPS, there are plenty of smartphone apps out there to generate a GPX file of your adventure. In the past I’ve always used the AllTrails app, which is available for free for both Apple and Android devices. AllTrails is designed for hiking and biking, but you can use it to track any activity. Here are directions to export your track from the AllTrails app. Make sure you export it as a GPX track, and not a GPX route.
Alternate Methods to Geotag Your Photos in Lightroom without a Built-in GPS
While geotagging photos and videos in Adobe Lightroom using a GPX track is by far the easiest and most accurate way to add location data to your images and videos, it’s not the only way.
First off, Lightroom offers several ways to add location data manually. You can directly edit the metadata of your images directly in Lightroom, or use the map interface to geotag your images. You can find plenty of tutorials for manual geotagging with a quick Google search. For more information, here is Adobe’s official documentation.
Unfortunately, there are quite a few drawbacks to geotagging your images manually. While it works fine for a few photos, it’s impossible to scale up to large photo albums, collections, and libraries, unless you have a serious amount of both time and will to put into it.
You can also geotag your photos using Python. We’ll cover this in a future tutorial, but you can use Python’s Pillow library to add location to your images’ metadata. You’ll need to loop through your image files, add the appropriate location metadata (lat/long coordinates or city/state/country), and then save the files. Be aware that this can get very complicated if you have a lot of photos taken in a lot of different locations. However, unlike manually adding location data, using Python is infinitely scalable, both up and down.
Conclusion
Geotagging photos is a critical part of both the workflow and staying organized as a landscape and travel photographer. With so many cameras still lacking built-in GPS functionalities, it becomes even more critical to know how to geotag photos in Adobe Lightroom without built-in GPS. Using GPX track files is by far the best alternative to built-in GPS that’s out there. Except for a few spots time zones can trip you up, the method is foolproof, accurate, reliable, and only requires one GPS, regardless of how many cameras you have. In my book, though, the benefits of having a geotagged library far outweigh the occasional hiccup from a mislabeled time zone.
Interested in more of these tutorials? I’n addition to the blog entries, I’ll be posting them to YouTube and sending them out via our email newsletter as well. Please subscribe to our email newsletter and our YouTube channel for the latest tutorials, and get exclusive deals to our online store that are not available anywhere else.
Pingback:How to Bulk Edit Your Photos' EXIF Data with 10 Lines of Python