GIS software is an incredibly powerful tool for displaying data on a map. However, they have their limits. And content creators often push well beyond those limits. Thankfully, Adobe Illustrator can help fill that void for creators that GIS programs, which are geared towards a much more technical audience, leave behind. Today, you’re going to learn how to import GIS shapefiles into Adobe Illustrator. Not only will this enhance your professional brand, but also put you leaps and bounds ahead of the crowds that are still using Google Maps.
Which begs the question…why are so many people still using Google Maps screenshots in their videos, presentations, and other content? Yes, Google Maps is an incredible tool, but they were not designed to be used in videos and presentations. Worst of all, they tend to flash on the screen for such a short time that it’s next to impossible to tell where you are, where you’re going, or what you’re doing. In which of the following maps can you locate Utah’s “Big 5” National Parks faster?
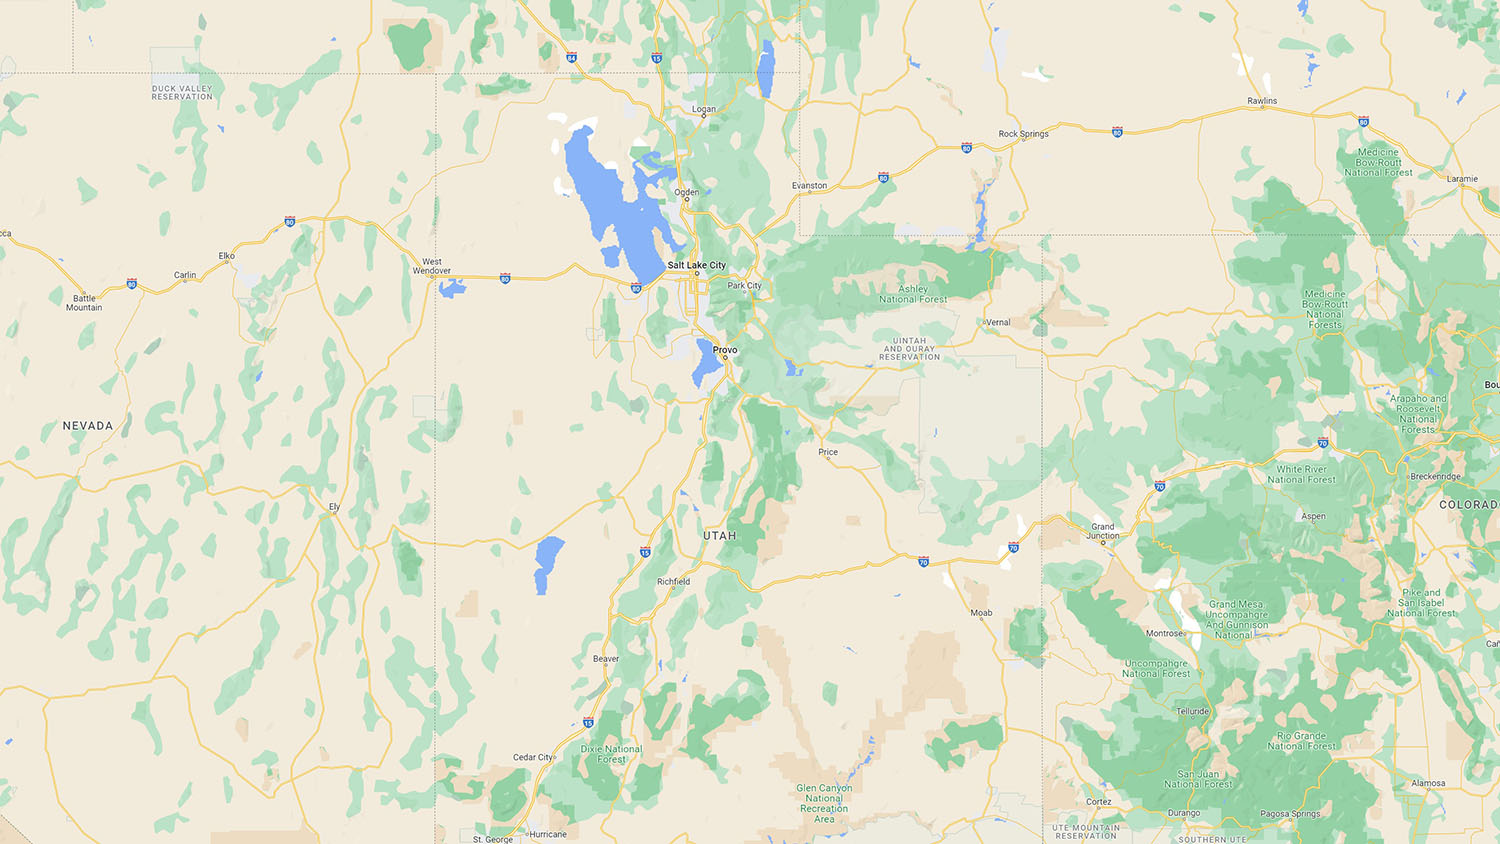
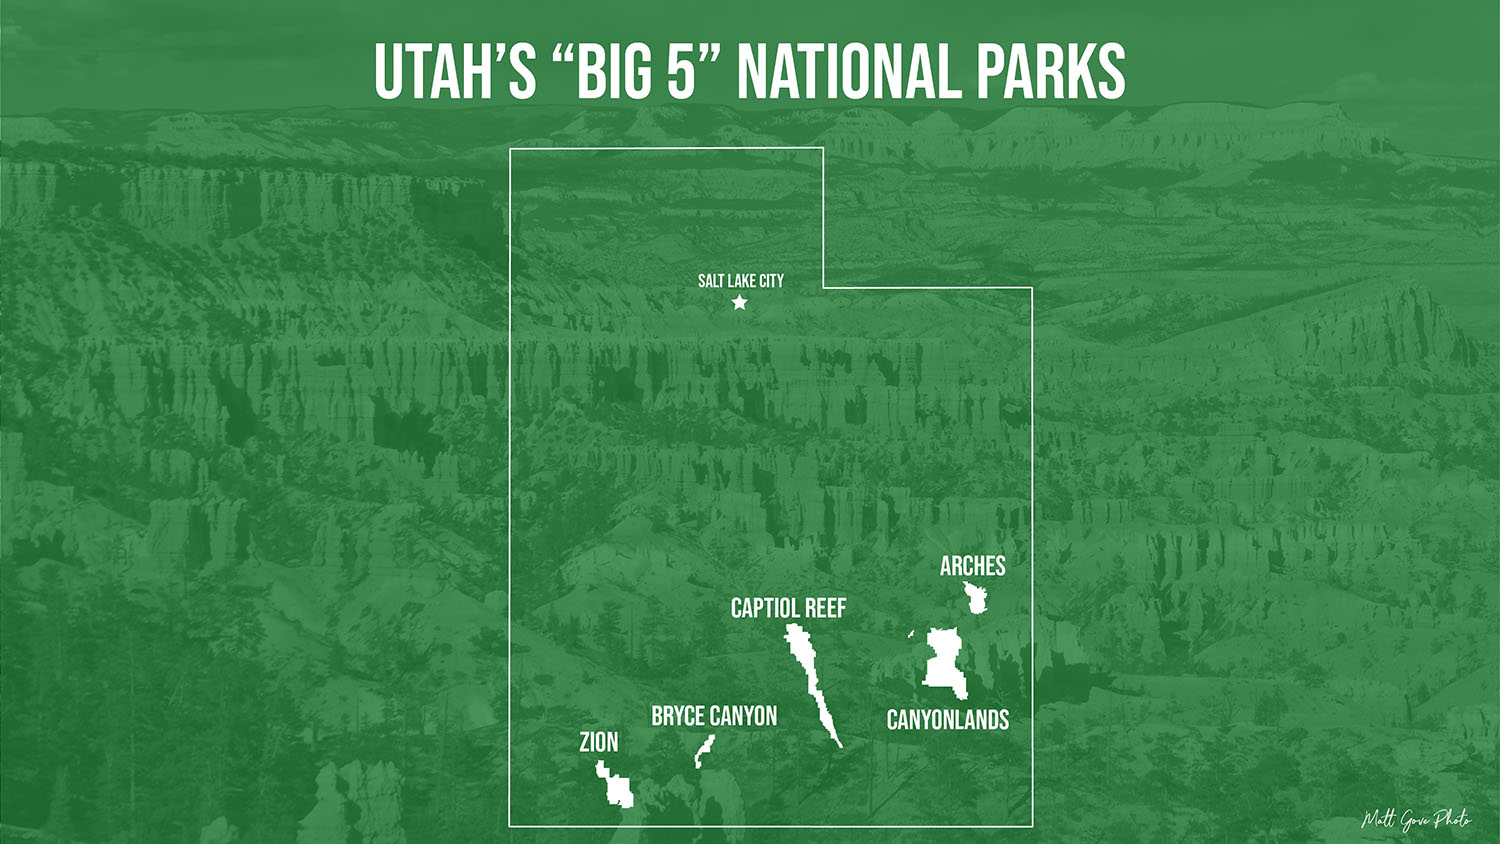
Creating custom maps in Adobe Illustrator can fix all of that. Put your own branding and style on the map. Remove everything that’s not relevant to the story you’re trying to tell. Give it a breathtaking design. Make it uniquely you. It’s such an easy way to look very professional and really stand apart from everyone still using Google Maps.
Finally, and best of all, you don’t have to spend a fortune to achieve incredible results with your maps. In this tutorial, the only thing you’ll need to pay for is Adobe Illustrator. Everything else is available free of charge. Let’s go.
What is a Shapefile?
A shapefile is simply a geospatial vector data format. Vector data formats in GIS and mapping applications are incredibly fast and efficient because of their small file size. You can put an enormous amount of data into a pretty small file, which also makes vector data formats ideal for web-based applications.
ESRI originally created the shapefile for its ArcView GIS software back in the early 1990’s. Today, shapefiles are widely used and nearly universally supported throughout the GIS world. However, I do want to point out that despite their widespread use, they are still a proprietary format. As a result, if you prefer open source file formats, I recommend using either GeoJSON or CSV to store your data. Both can be used as vector formats and you can import them into Adobe Illustrator using the same method we’ll use for shapefiles below.
Shapefiles exist for just about every type of feature out there. You can store data as points, lines, or polygons. Indeed, I’ve used them for everything, including severe weather warnings, road trip routes, National Park boundaries, and much more. Because of their widespread availability, both ESRI and government entities (federal, state/province, and local) maintain extensive databases of shapefiles. If you can’t find what you’re looking for there, you should be able to find it with a quick Google search. While this tutorial only uses the geometry of the shapefiles, you can easily add your own data either directly into the shapefile or through region mapping.
Why Import Shapefiles into Adobe Illustrator?
If you’re just looking to plot data on a map, then by all means, a GIS program is the best way to go. However, GIS programs definitely have their limits. That’s where Adobe Illustrator comes in. When you import your shapefiles into Adobe Illustrator, you get much finer control over the final map design and look. The end result is a much more polished and professional-looking map, especially if you’re putting them into videos or presentations.
Furthermore, Adobe Illustrator provides the bridge to animating your maps. If you’re a content creator or giving a presentation, fully animated maps will put you in a class above your competition who are still using screenshots of Google Maps in their videos and presentations. Don’t believe me? Have a look at the maps below. Which one is easier to identify the “Big 5” National Parks in southern Utah?
While GIS software does support the bare basics for animation, you can make far more powerful animations even just using Illustrator itself. However, to unlock its full potential, you’ll need to use something like Adobe After Effects.
Unfortunately, animation is a topic for another day. We’ll cover that in a future tutorial. Let’s get back to learning how to import shapefiles into Adobe Illustrator.
1. Download and Install QGIS, a Free GIS Program
As a content creator myself, I know how critical it is to keep the cost of doing business to a minimum. And as a GIS specialist, I also know how expensive some proprietary GIS software can be. As a result, I’ve designed this tutorial so that the only piece of software you need to pay for is Adobe Illustrator.
If you’ve used ESRI’s ArcGIS before, you may be aware that Arc has an “Export to Illustrator” option built into it. That will export your shapefiles directly into a .ai Adobe Illustrator file. However, the desktop version of Arc also costs a bare minimum of $700 per year to use. Instead, we’ll use QGIS for this tutorial. QGIS is open source and, best of all, completely free. And unlike Arc, it runs on MacOS, Windows, and Linux. You can download QGIS here.
2. Prepare Your Shapefiles in QGIS
Before we can import our shapefiles into Adobe Illustrator, we first need to prepare them in QGIS. Using QGIS will ensure that each feature appears on your map in its proper location. You can try to eyeball the correct location once it’s all imported into Illustrator, but trust me, that never ends well.
Create a New Project in QGIS
First, you’ll need to create a new project in QGIS into which you’ll load your shapefiles. You’ll also need to change the default map projection, which will prevent your shapefiles from becoming distorted.
First, open QGIS and select Project > New Project. This will open a blank project. Then, in the bottom right, click on the text that says “EPSG:4326”. QGIS will open a window so you can select a new projection.
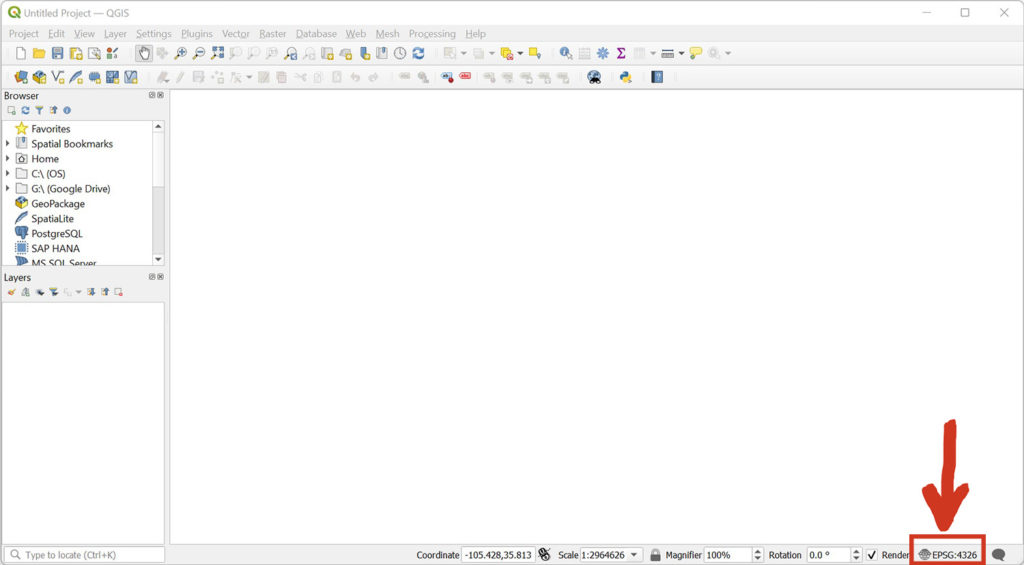
In the search bar, search for “Pseudo-Mercator”. You’ll likely see multiple results returned. Select the result labeled “EPSG:3857”.
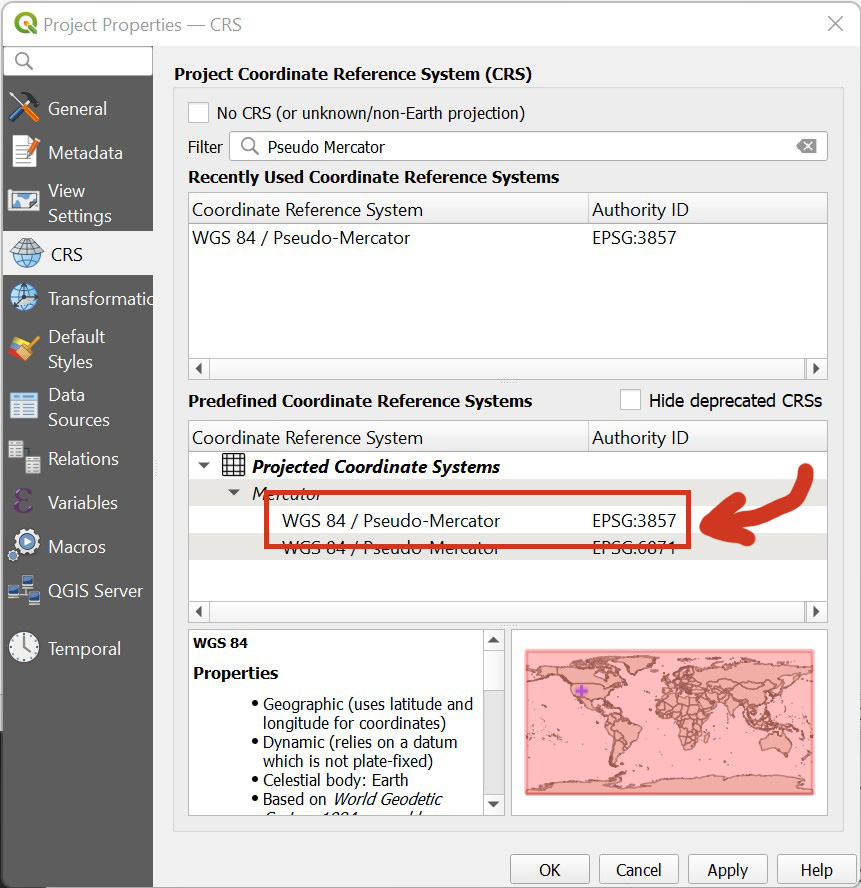
Click OK to confirm your changes. The text in the bottom right should change from “EPSG:4326” to “EPSG:3857”.
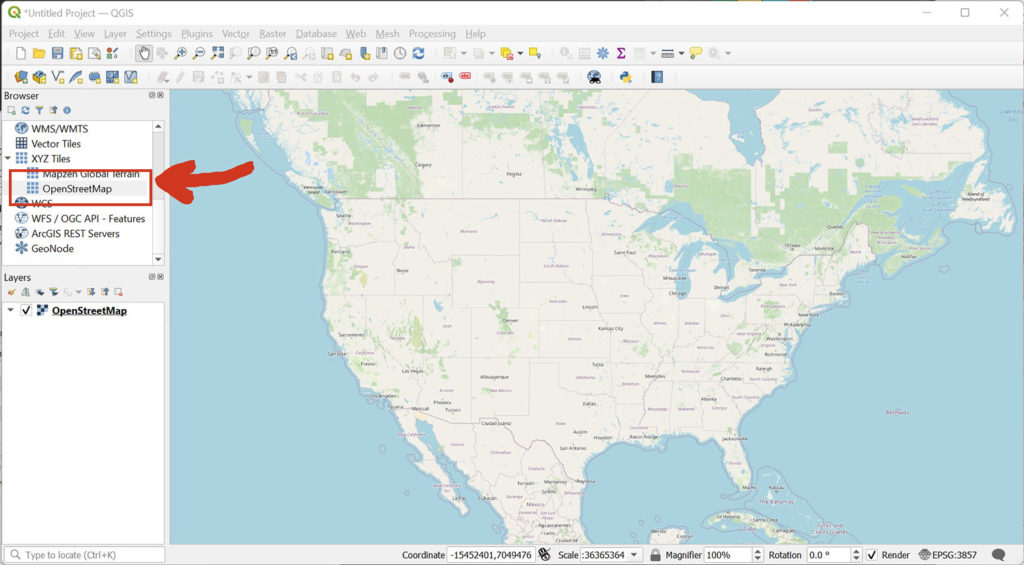
Finally, if you want to include a basemap to confirm your features are both properly projected and in the correct location, double click on the OpenStreetMap option in the browser on the left-hand side of your QGIS dashboard. Please note that you should only use the basemap should a reference and never import it into Adobe Illustrator with the rest of your shapefiles.
Load Your Shapefiles into QGIS
When you prep your shapefiles in QGIS for import into Adobe Illustrator, you can include as many or as few as you want. When you export them to Adobe Illustrator, they’ll all get exported as a single-layer entity, so you don’t need to worry about keeping track of a ton of layers.
Adding shapefiles to your QGIS project is easy.
- Select Layer > Add Layer > Add Vector Layer from the top menu. A window will open.
- Under the “Source” section, you’ll see an input labeled “Vector Dataset(s)”. Click on the three dots to the right of the text input.
- Navigate to the folder with your shapefiles and select all the shapefiles you wish to load into QGIS. You only need to select files with the
.shpextension. - Click the “Add” button at the bottom of the window to add them to your QGIS project.
- Repeat steps 2-5 until all of your shapefiles are loaded into QGIS.
- Close the window.
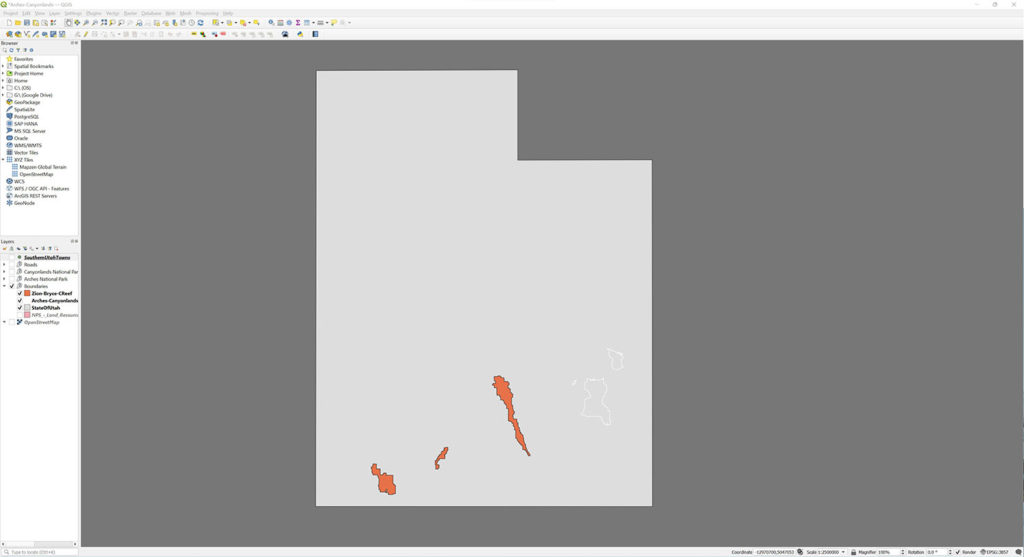
Once everything is loaded into QGIS, make sure that all of the features in the shapefiles that you want to import into Adobe Illustrator are visible. You may need to re-arrange the layers in the Layers panel on the left hand side if you can’t see something.
Finally, hide any features or sublayers in the shapefiles that you do not want to import into Adobe Illustrator. Simply uncheck the feature in the Layers panel to hide it. If you need finer control for removing an individual item, you can easily do that once we import it into Illustrator.
Don’t Worry About Appearance in QGIS
Don’t worry about what the map looks like in QGIS. There’s no need to adjust colors, line thicknesses, or anything else. We’ll do that in Illustrator. Adobe Illustrator gives you much better and finer control over the look of the map than QGIS does. The one exception would be if two features are blocking each other and you need to remove the fill of one so you can see the other.
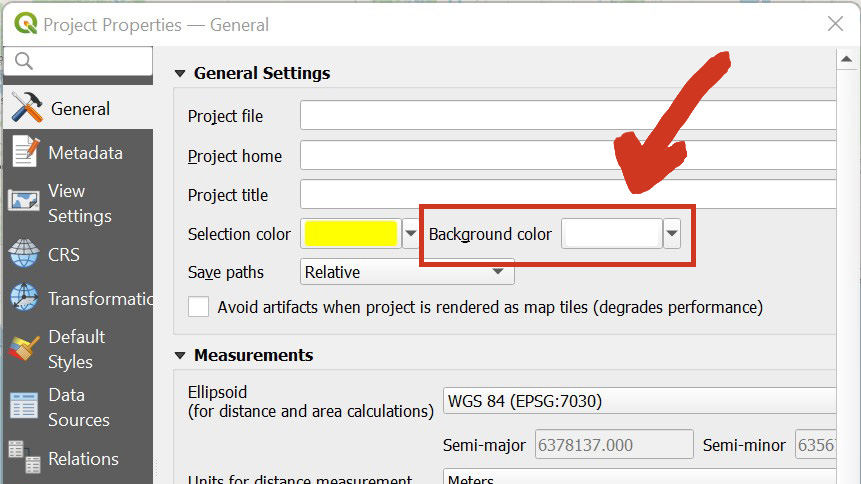
Finally, if you’ve used a basemap, uncheck it from the layers panel on the left to hide it. The basemap will create all kinds of headaches if you import it into Illustrator. Alternatively, if you’re having issues with white features on a white background in QGIS, just change the background color. You can easily delete that solid background once you get it into Illustrator.
To change the background color, follow these steps.
- In the top menu, select Project > Properties. A window will open.
- Click on the “General” tab in the upper-left.
- In the fourth row down from the top, click on the white box to the right of “Background color” and select the background color you wish.
3. Create a Layout in QGIS to Easily Export Your Shapefiles into Adobe Illustrator
First, zoom and pan the map in your QGIS project to the exact level and position you want to display it in Illustrator. It doesn’t need to be exact, but you should include a little more than you intend to use. It’s easy to clip off the extra after importing the map into Illustrator.
Once your map is zoomed and positioned correctly, it’s time to create a layout so you can export it out of QGIS. In the top menu, select Project > New Print Layout. Follow the prompts to create your new layout. For best results, make sure the layout size is set to either US Letter or A4. Then click the “Add Map” button on the left-hand side.
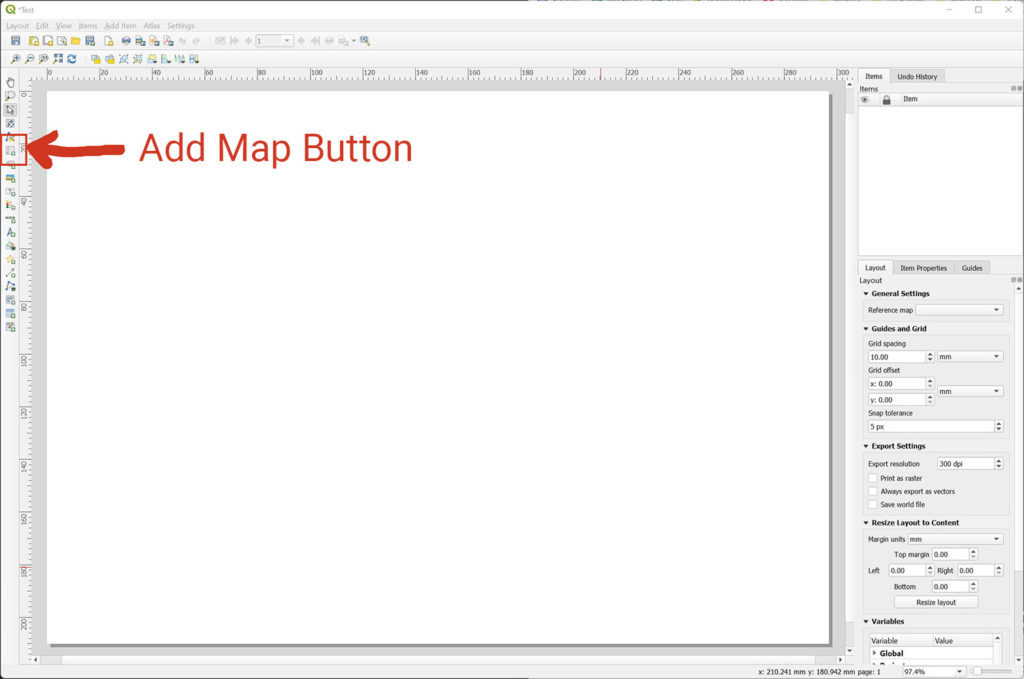
Finally, click and drag your map so it fills the blank layout. You should see your map appear. If you didn’t get the entire page filled, simply click and drag each corner of the map out to the corners of the blank layout.
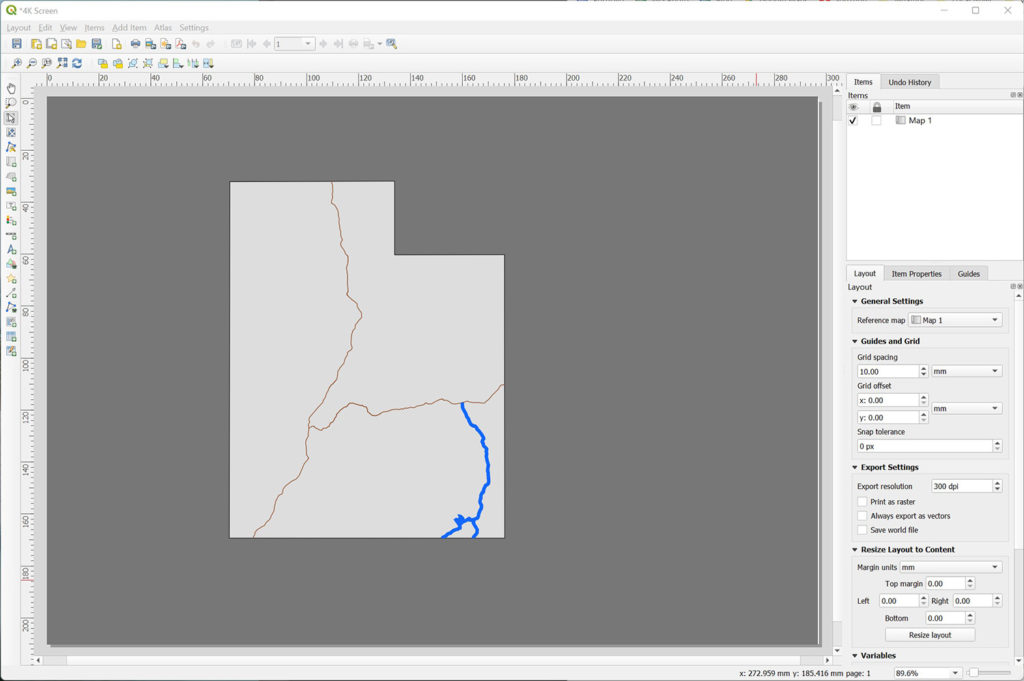
Congratulations, you’re ready to export your map out of QGIS. Don’t close the layout window just yet, because you’ll still need it in the next step.
4. Export Your QGIS Layout into SVG Format
Scalable Vector Graphics, or SVG, is an open-source XML-based framework for defining two-dimensional scalable vector images. It’s the most common type of vector image used in web-based applications today. The main advantage of vector images is that they can be scaled infinitely up or down without losing quality or becoming pixelated. As a result, you can cram a huge amount of data into a very small file. And best of all, Illustrator can automatically convert your .svg image into its default .ai format on import.
To export your shapefiles into .svg format, go back to your layout window. In the top window of the layout window (not the main QGIS dashboard), select File > Export Image as SVG. Follow the prompts to save the .svg file to your local hard drive.
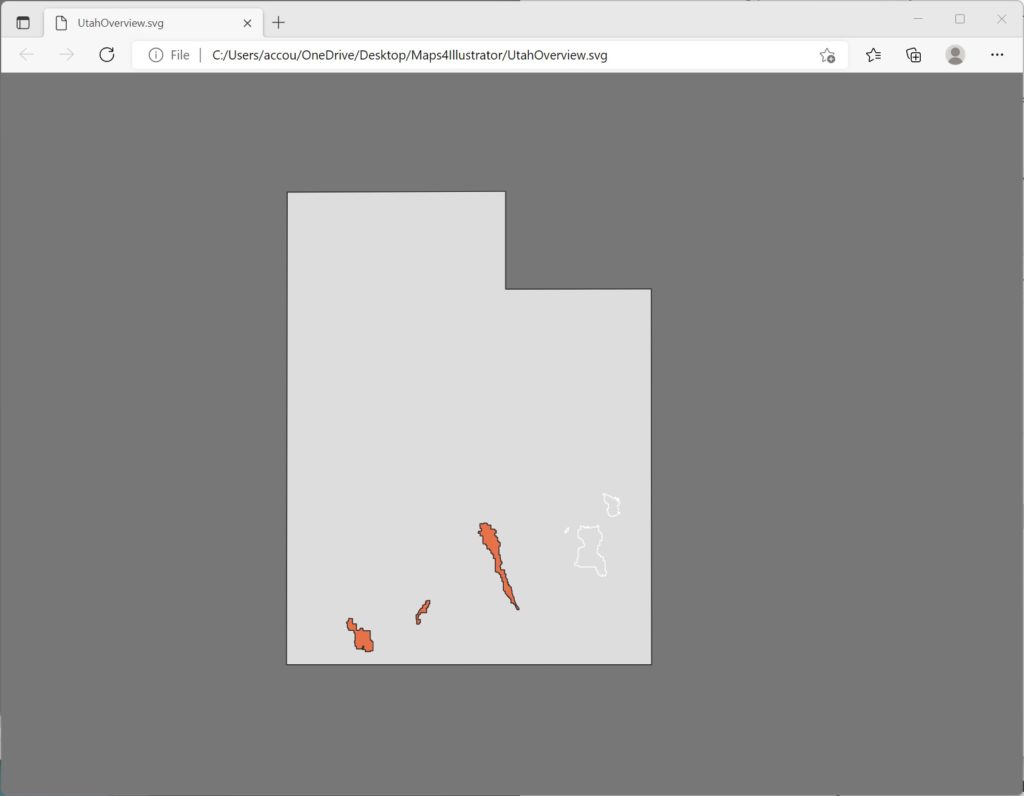
One thing to be aware of is that QGIS may give you a warning about some SVG’s not being exported correctly. I have not had any issues with SVG exports, but if your SVG’s do not export correctly, simply export your shapefiles as a .pdf file instead. In the layout window, select File > Export Image as PDF. PDF files are also a vector format, and you follow the exact same steps to import everything into Illustrator, regardless of whether your file is an SVG or PDF.

5. Place Your Exported SVG File into Illustrator
All right, we’re almost there. All that’s left to do is to import our shapefiles (in SVG/PDF format) into Adobe Illustrator. Once that’s done, let your creative side take over and have some fun.
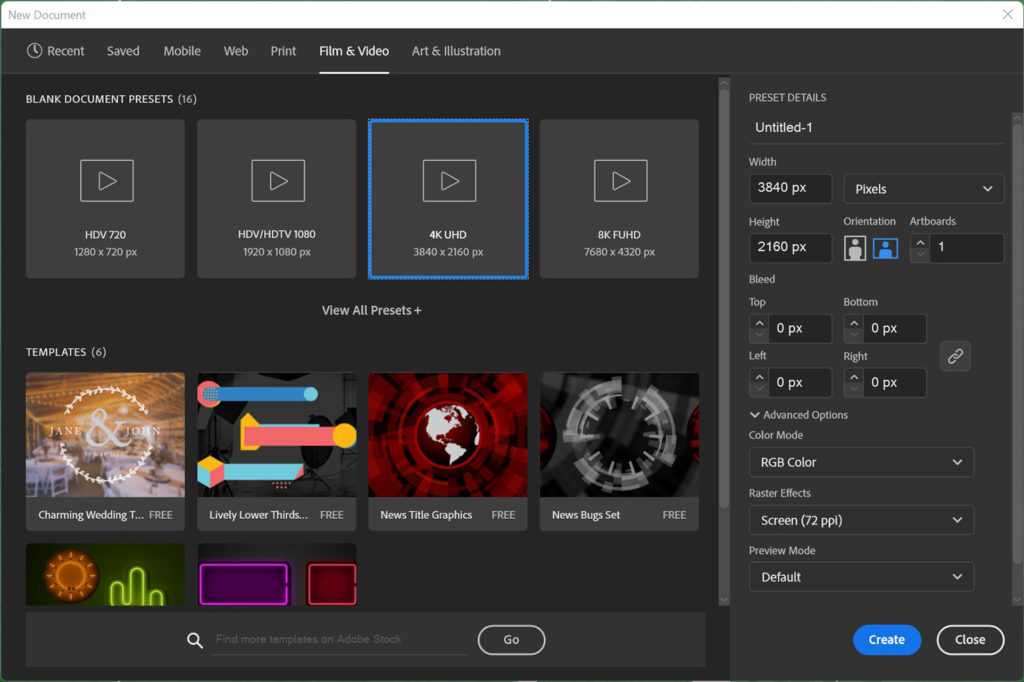
First, open Adobe Illustrator and create a new file. You can use any size artboard you want. However, because I create these maps for use in my travel videos, I’ll use a 4K (3840×2160) artboard.
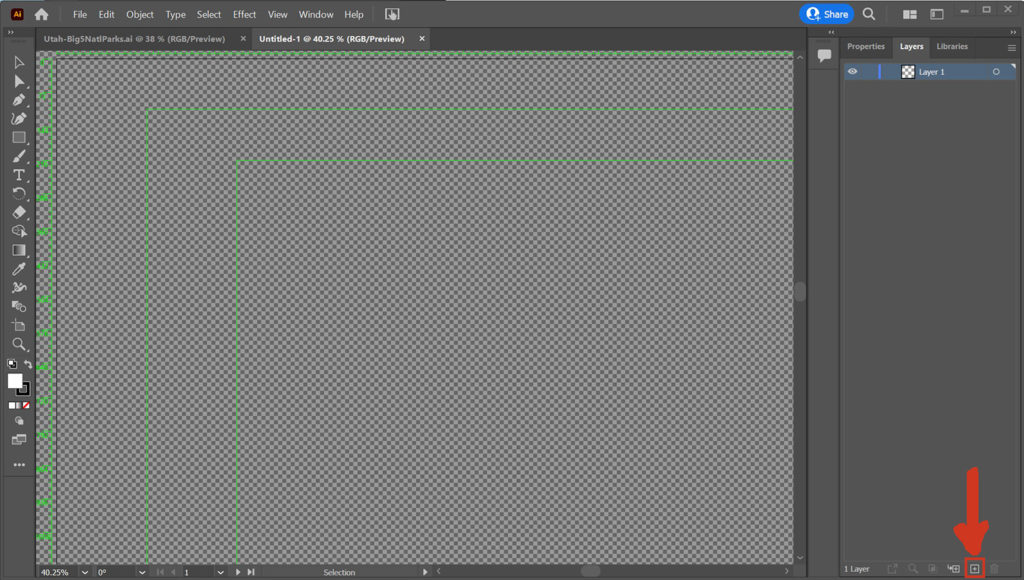
Second, create a new layer that will hold only your SVG file. Putting the SVG file into its own layer allows us to filter, parse, and extract specific elements of the SVG file into our Illustrator project. Then, once we’ve extracted everything, all we have to do is delete or hide the SVG layer to remove all of the extras.
Linking vs. Embedding Images in Adobe Illustrator
When you import any kind of image into Adobe Illustrator, you can choose whether to embed the file in Illustrator or just link to it. Linking the image file means that Illustrator will reference it from wherever it is on your computer. If you move or delete the image, it will disappear from your Illustrator project. Embedding, on the other hand, copies the image into Illustrator and saves it as part of the .ai file. That way, if you move or delete the original image file, it will still be in your Illustrator project.
Because your exported shapefile vectors are so small, I highly recommend you embed the SVG into Illustrator. Embedding the SVG into Illustrator is easy and straightforward.
- In the top menu, select File > Place.
- Navigate to the SVG File you exported from QGIS. Click “Add”.
- Click anywhere in your Illustrator window to place the SVG.
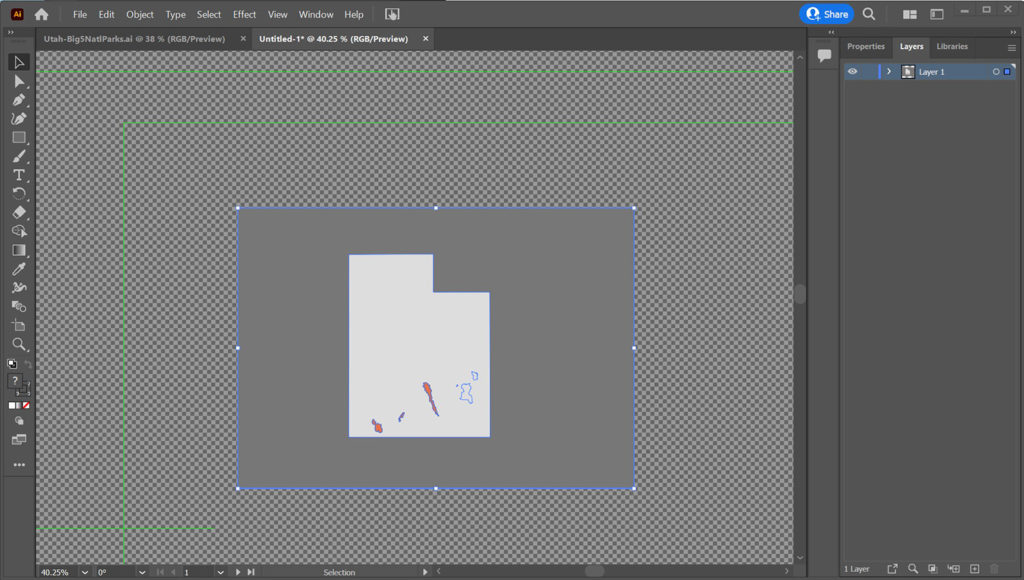
You should now see the SVG file that you exported from QGIS. However, it’s probably not in the right place in the Illustrator window, nor is it scaled correctly.
A Note on Moving and Scaling Your SVG File in Adobe Illustrator
Adobe Illustrator automatically separates the features in your SVG file to mirror the original shapefile. That’s a good thing, as it makes incredibly easy to separate out each element in Illustrator. However, if you’re not careful, you can easily move or scale features of your map out of place. Thankfully, it doesn’t take much to prevent things from moving out of place.
The easiest way to move or scale the SVG as a whole is to lock all of the other layers first. Because the SVG is in its own layer, then all we have to do is just hit Control + A on Windows or Command + A on a Mac to select all. With the other layers being locked, you’ve selected your entire SVG file without bothering anything else in the Illustrator file.
Second, make sure you hold down the Shift key when scaling the SVG. Doing so maintains the aspect ratio of the SVG. Without it, your map will become distorted and misshapen.
Positioning Your Map in Adobe Illustrator
it’s best to center your map in your Illustrator project, filling as much of the artboard as possible. However, make sure you leave room, particularly at the top, for any titles, headers, labels, and legends you would like to include.
At this point, it’s still perfectly fine if parts of the map extend beyond the boundaries of the artboard. We’ll delete those parts in the next section. And remember, you’re working with vectors, so you can infinitely scale them up or down without losing quality or pixelating.
6. Organize the components of the SVG into Layers in Adobe Illustrator
Depending on what you’re using the Illustrator map for, this can be one layer or many. It’s entirely up to you. However, do note that if you’re animating the map, every individual item or group of items that you’ll be animating as a single unit needs to be in their own layer. In other words, you can’t animate pieces of a layer. You can only animate the whole layer.
Additionally, if you have roads or routes on your map, make sure that you join the pieces of each route together so the route can be a single entity on the map. Having a route in several pieces can be an absolute nightmare if you’re trying to animate it. But even if it’s just going to be static, it’s still much easier to manage a single route than several pieces of it. To join paths in Illustrator, select each element of the paths you want to join and go to Object > Path > Join.
How to Extract SVG Components into Adobe Illustrator Layers
- Click the New Layer button on the bottom right of the Illustrator window to create a new layer.
- Go through the components of the SVG layer and find the ones you want to extract. This may take some trial and error by showing and hiding each piece.
- In the Layers panel in Illustrator, click and drag that component from the SVG layer to the new layer.
- Adjust the line width, colors, fills, strokes, opacities, etc. to set the final look or design of the feature you just moved.
- Add any features to the layer that were not in the SVG file. These are most often the feature labels you can add with Illustrator’s text tool.
- Repeat steps 1 through 5 for each feature layer you wish to create.
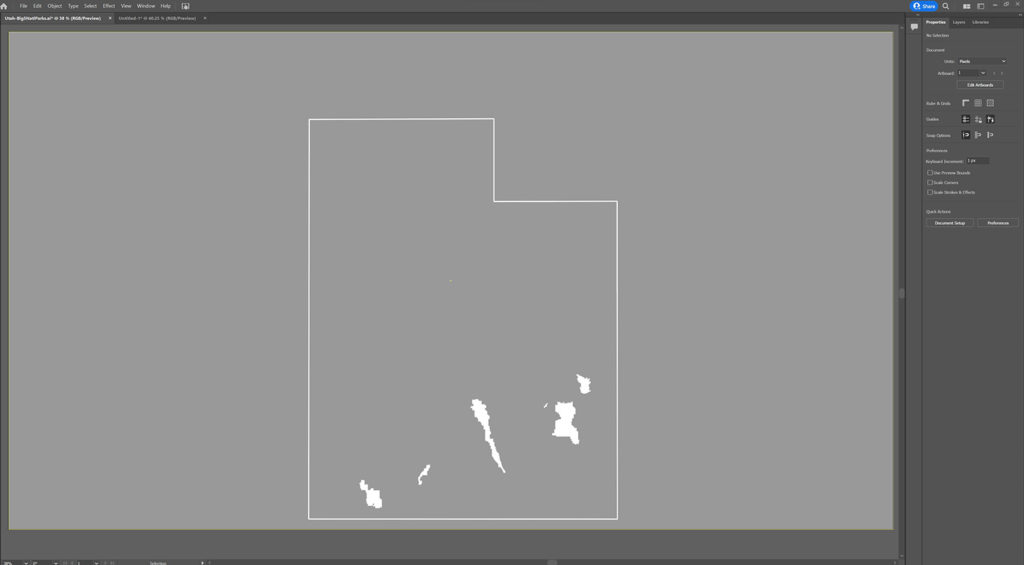
When you finish extracting the SVG components you’re using in your Illustrator map, there will likely still be features left over in the SVG layer that you’re not using. Putting the SVG file in its own layer makes it very easy to clean up the leftovers. If you know you’re not going to be using anything else in the SVG layer, you can go ahead and delete the layer. On the other hand, if you know you’re going to be using the leftovers or are not sure, simply hide the SVG layer so you can access it later.
Conclusion
Being able to export ESRI shapefiles into Adobe Illustrator opens up a whole new set of opportunities for content creators, artists, and other creatives to use maps. Creating professional branded, elegant, and easy-to-read maps in Adobe Illustrator will put you leaps and bounds ahead of the masses that are still using screenshots of Google Maps in their videos and presentations.
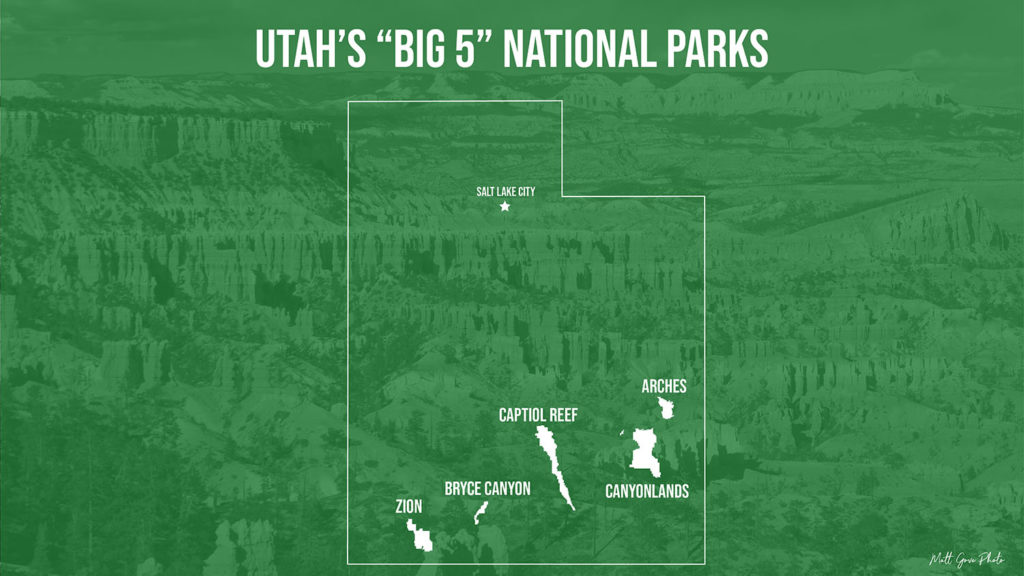
In future tutorials, we’ll go over how to put the full Illustrator files together like you see in my travel videos. Then, learn how to animate your maps using both Adobe Illustrator and After Effects. In the meantime, we’d love to help you get started with your creative maps and animations. Please get in touch with us today to discuss your project and how we can bring your mapping visions to life.
Top Image: Warm Later Afternoon Light Provides a Dramatic Contrast Against Grey Winter Skies
Canyonlands National Park, Utah – December, 2021