I recently built a couple of DIY solar radiation shields to house outdoor temperature sensors I have at my house. I built one out of plastic plates and one out of plastic bowls because I was curious to see if one worked better than the other as a solar radiation shield.
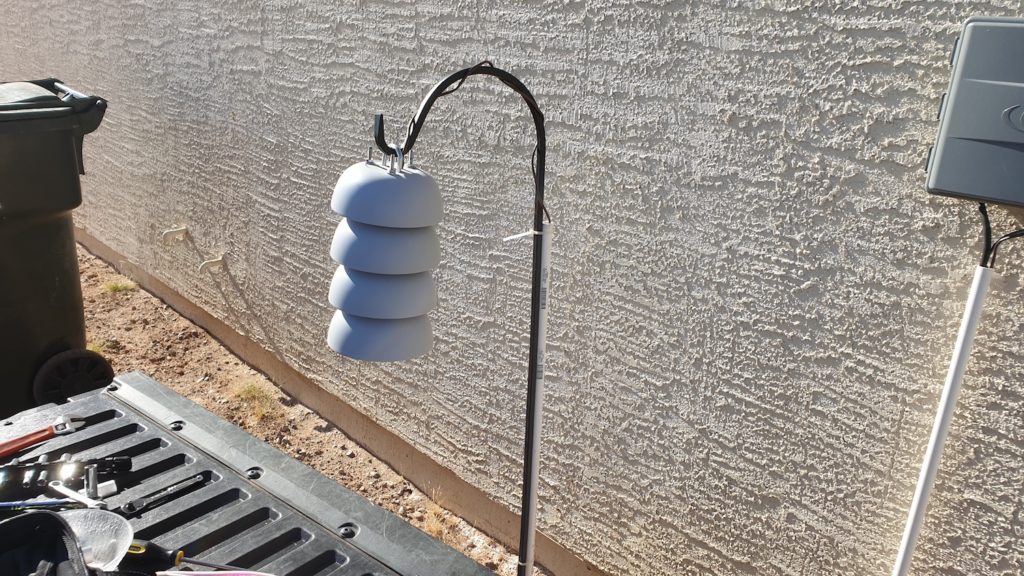
The “bowls” solar radiation shield in my back yard on May 29, 2019 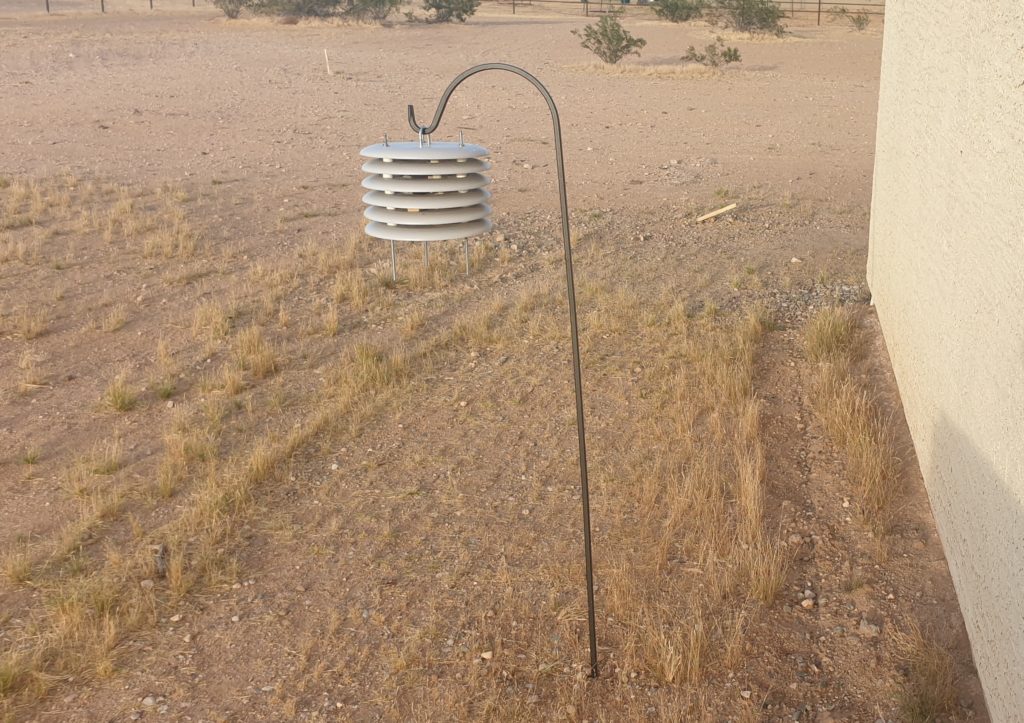
The “plates” solar radiation shield in my back yard on May 10, 2019
A Word on Solar Radiation Shields
The purpose of a solar radiation shield is simple. Block solar radiation from reaching temperature sensors so you can get accurate readings even if you do not have a location in the shade to mount your sensor.
The goal of solar radiation shields is to ensure temperature readings that are within the accuracy for your sensor’s calibration. They block the solar radiation and allow for ample air flow across the sensor.
Experiment Design
To truly test which solar radiation shield worked best, I wanted to expose them to the most extreme environment possible. Thankfully summers here in Phoenix are more than happy to oblige. As an added bonus, they get exposed to direct sunlight in the early mornings and late afternoons for about 6 to 8 weeks on each side of the summer solstice.
Running the experiment in early June would satisfy both requirements: extreme heat/dry and exposure to direct sunlight. June is typically the hottest and driest month in Phoenix. Afternoon highs pretty routinely hit 110°F (about 45°C). Relative humidity typically bottoms out between 5% and 15%.
I took hourly observations from the temperature sensors in both the bowls and the plates and compared them to the observations at Phoenix Sky Harbor International Airport. Sky Harbor is the official National Weather Service observation station for the Phoenix area. I also compare them to the observations at Luke Air Force Base in Glendale, which is closer to my house. The observations were taken Monday through Thursday for three weeks.
Hypothesis
I went back and forth for a long time on which one I thought would perform better. The key to obtaining accurate temperature readings from inside a solar radiation shield is proper airflow across the sensor. Because of that, my gut was telling me that the shape of the plates would allow for slightly better airflow across the sensor. I opted to stick with my gut feeling for my official hypothesis and go with the plates.
Results
Before diving into the results, there are a few things we need to take into consideration:
- The greater Phoenix area is one of the largest urban heat islands in the world. You must account for the heat island when comparing the National Weather Service observations. The Weather Service takes observations inside the city, while my house is outside the city.
- The sensor inside the plates was not connected to a data logger. It is missing data points for where I was sleeping, cooking, not paying attention, etc.
Week 1: May 20 – 23, 2019
Despite my best efforts to run the experiment in as extreme an environment as I could get, the week of May 20th was unseasonably cool across the desert southwest. Normal highs in Phoenix this time of year are right around 40°C/100°F. As you can see from the plots, we didn’t get anywhere close to that benchmark. However, it did provide a nice contrast to the observations I took once the weather heated back up.
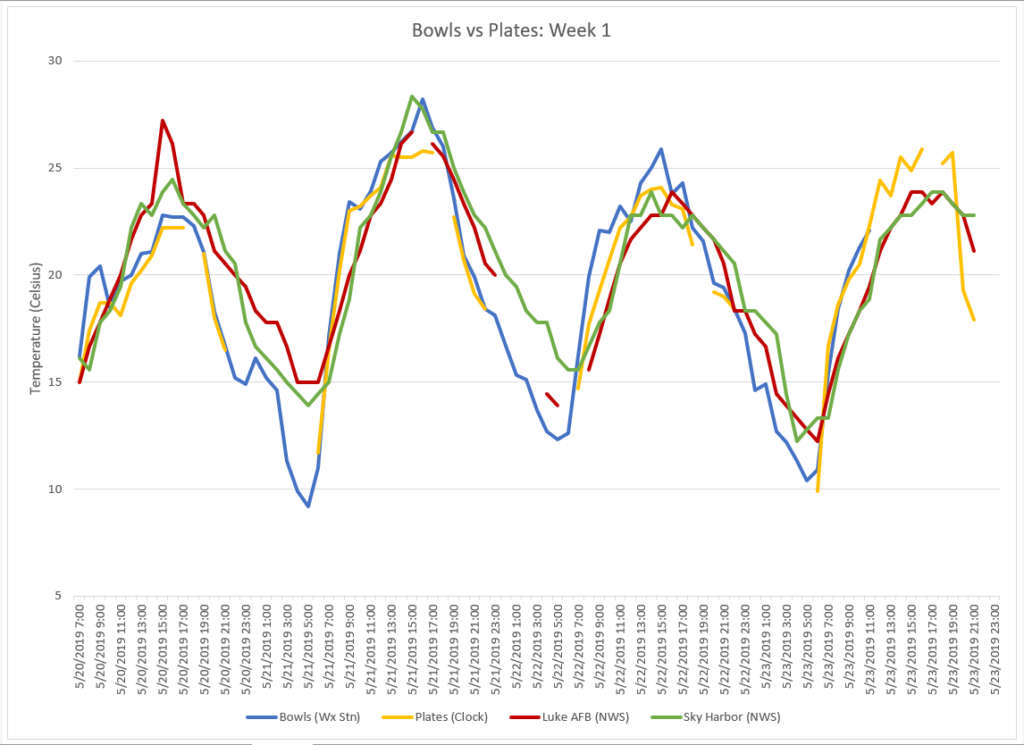
This dataset gave me pretty much what I was expecting:
- Both day and night observed temperatures were slightly warmer in the city than at my house.
- Instances of the homemade solar radiation shields having insufficient airflow or being in direct sunlight did not result in any major temperature anomalies.
- The plates performed slightly better during the heating of the day. They both stayed slightly below the city observations and were closer to the National Weather Service observations.
- There was no noticeable difference in the performance of the bowls and the plates at night.
Week 2: May 27 – 30, 2019
The Phoenix weather finally started warming up this week, giving some interesting results as the extreme environment returned. The beginning of the week started cool, but became hot by the time Wednesday and Thursday rolled around.
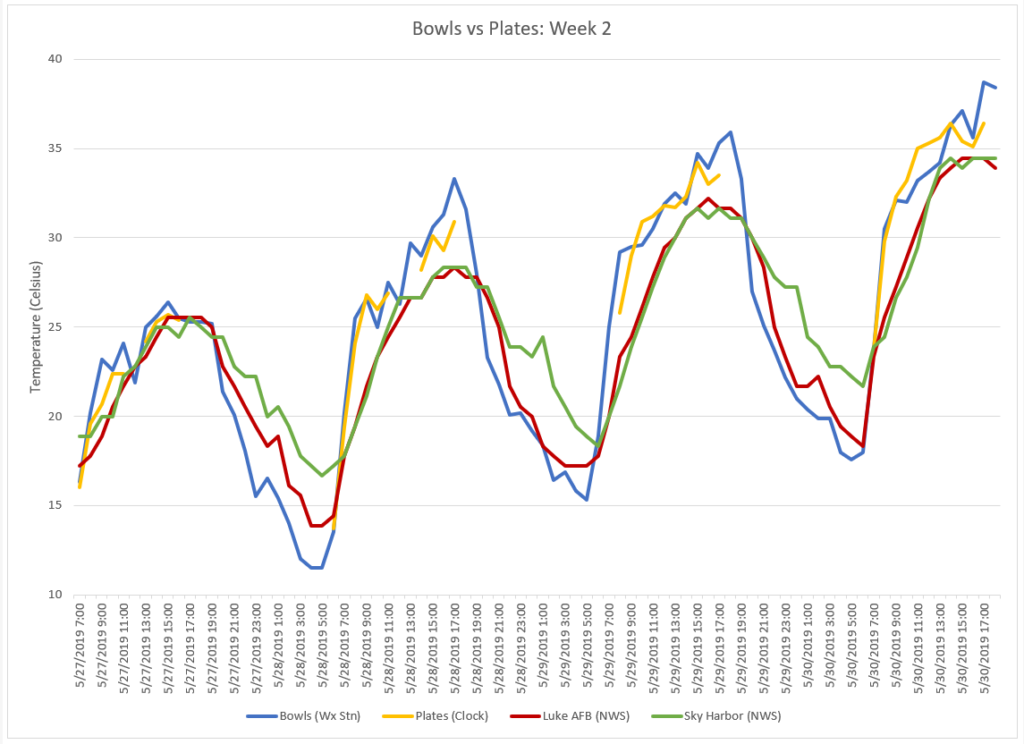
Right away, a few things really jumped out at me from this plot
- The effect of the solar radiation shields being in the sun, especially in the late afternoon (about 3 to 6 PM), is very noticeable, especially in the hotter temperatures.
- Remember the plates and bowls (yellow and blue lines, respectively) should be just below the Sky Harbor (green) and Luke AFB (red) observations due to effects of the urban heat island.
- When the bowls/plates are in direct sunlight in the morning, they go into the shade at about 9:00 AM. Notice how the observed temperature on the blue and yellow lines temporarily drops right around 9 AM each day. Both solar radiation shields definitely feel the effect of being in direct sunlight.
- Interestingly, the difference between the bowls/plates observations and the National Weather Service observations remained pretty constant as high temperatures increased.
- Once again, the plates performed slightly better, as they were closer to the official National Weather Service observations.
- Bowls are mounted west of the plates and are in direct sunlight for slightly longer in the afternoon. However, that difference is only just a few minutes, so its effect should be minimal.
- The sensors performed as expected at night, with temperatures at my house reading slightly below the city observations.
I expect that the final week of the experiment to be the hottest of the three. It will be interesting to see if those results corroborate what we’ve seen so far.
Week 3: June 3 – 6, 2019
The final week of the experiment was by far the hottest, with afternoon temperatures finally exceeding 40°C or about 105°F. Keep Week 2’s results in mind as we look at the results of Week 3.
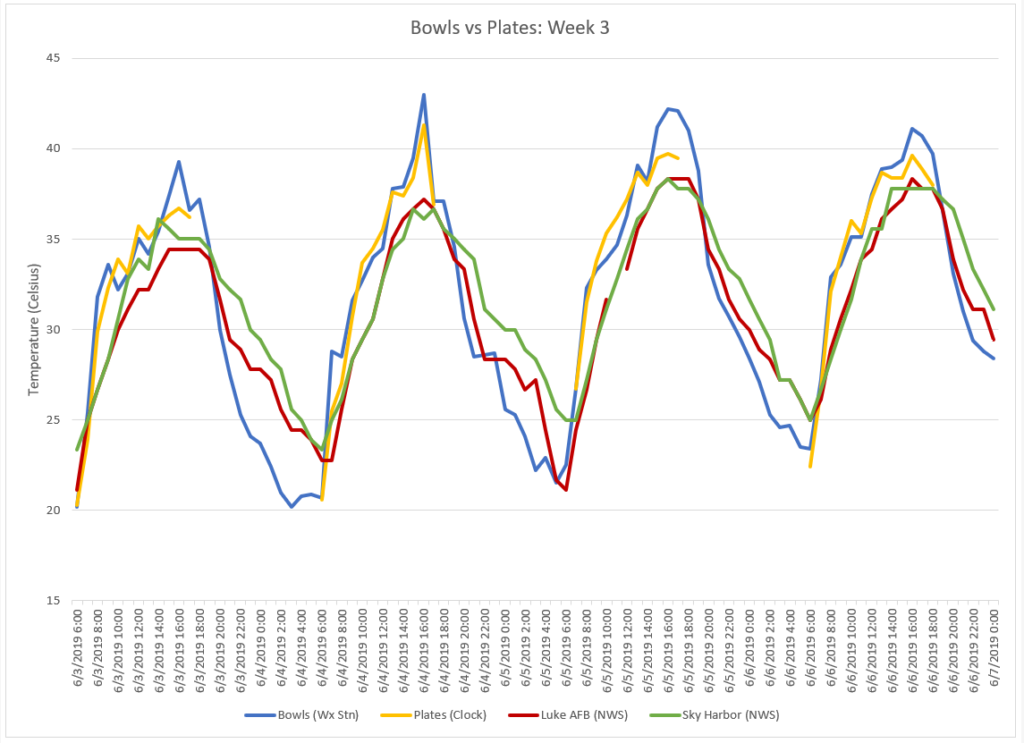
The patterns from Week 2 are also evident in Week 3.
- The effects of both solar radiation shields being in direct sunlight are clearly evident on all four days.
- The observed temperatures were as expected at night, with temperatures at my house being slightly lower than the city observations.
- The temporary drop in observed temperatures in the bowls and plates occurred at about 9 AM each morning when the solar radiation shields went into the shade.
- The difference between the bowls/plates and the National Weather Service observations do vary a bit more than in Week 2. This is most likely due to higher wind velocities.
- Again, the plates seemed to perform slightly better than the bowls during the day.
The Verdict
This was a fun and interesting experiment with a few curveballs. I was able to draw the following conclusions and propose solutions to problems that I discovered during the experiment.
- The plates performed slightly better than the bowls in both cooler and hotter weather.
- Both types of dinnerware were affected by being in direct sunlight in the early morning and late afternoon.
- Thankfully the solar radiation shields are completely out of direct sunlight for close to 10 months out of the year.
- Adding fans to the solar radiation shields to ensure an ample and consistent airflow across the sensor will noticeably reduce the effects of being in direct sunlight. It likely will not eliminate them completely.
- The sensors all performed as expected at night.
- Wind velocities should be recorded as well.
- All sensors should be connected to dataloggers so I can collect data 24 hours a day.
In the future, I would like to run the experiment again in both winter and summer settings. The results of those experiments combined with the results of this experiment would then give us a definitive answer as to whether bowls or plates make the best DIY solar radiation shields.