I recently identified a rather unfortunate bug that left part of my weather station’s QA/QC algorithm redundant. Fixing it treated the symptom, but not the cause of the problem. Today, we’re going to look at what is causing the temperature sensor on one of my Raspberry Pi’s to seemingly randomly show air temperatures close to 500°F. Can we nip the problem in the bud before it even gets to my QA/QC algorithm?
Before I begin troubleshooting an issue, I always brainstorm a list of at least 2-3 things that I think may be causing the problem. In no particular order, some of the potential causes I came up with were:
- An electrical problem that is causing voltages to go haywire
- A malfunctioning or defective sensor
- A bug in the Python code on the Raspberry Pi that reads the raw data from the sensor and converts it into Celsius
Start with the Easiest Issue to Troubleshoot
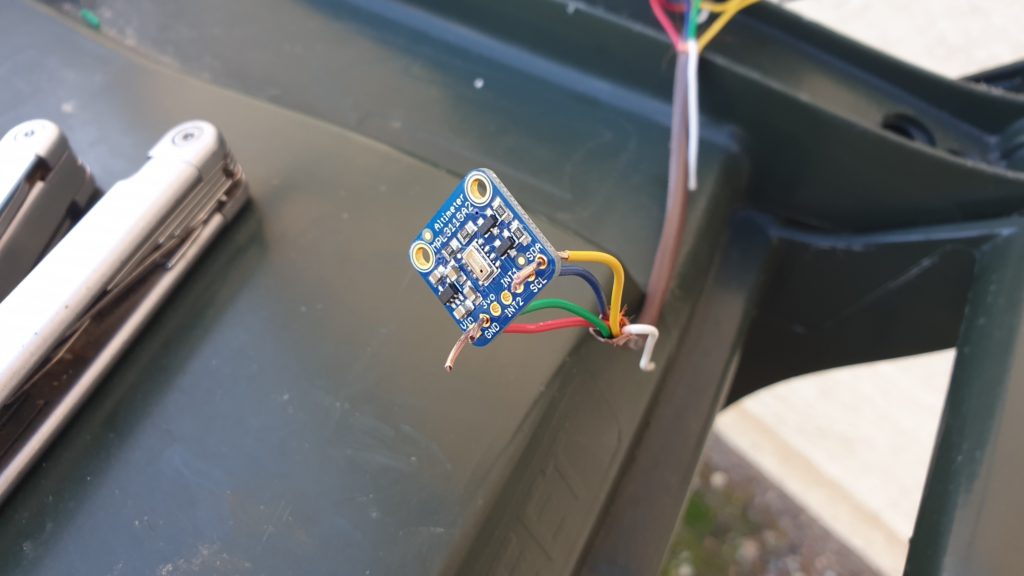
Before diving into troubleshooting, I always see if there are any causes I can reasonably eliminate. In this case, a malfunctioning or defective sensor is highly unlikely to be causing the problem. The sensor is an MPL3115A2 I2C digital barometric, temperature, and altitude sensor. It has been in service on the Raspberry Pi since last May and has taken nearly 1.2 million measurements. Of those 1.2 million measurements, the QA/QC algorithm has flagged 590 of them. That works out to 0.04% of measurements being bad, or a 99.96% measurement accuracy rate.
Identify Possible Bugs where the Raspberry Pi Interprets the Sensor Readings
Of the remaining two possibilities, I always start with whatever is easiest to troubleshoot. In this case, it would be a possible bug in the Python code. On the Raspberry Pi, Python interprets sensor readings and logs them in the database. Intermittent electrical problems are a nightmare to diagnose in the best of situations. The first thing to do is to look at the data and try to identify any patterns. If you’ve ever watched any detective shows on TV, you know what they always say: evidence doesn’t lie.
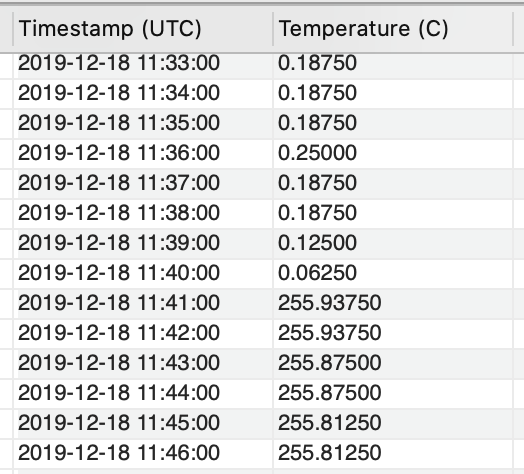
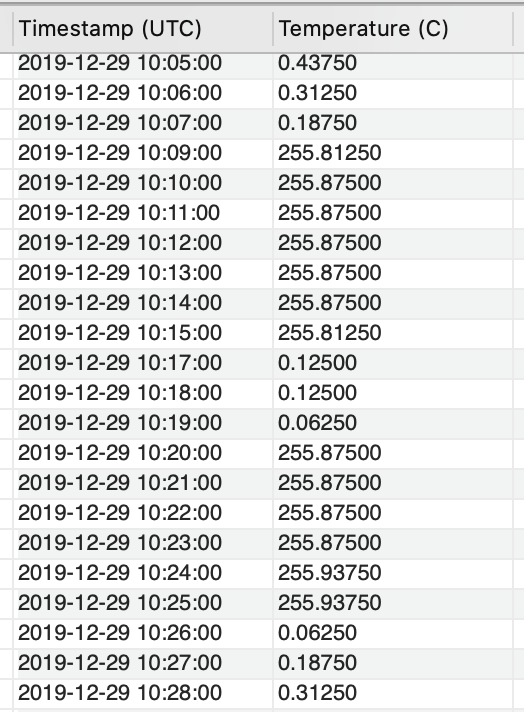
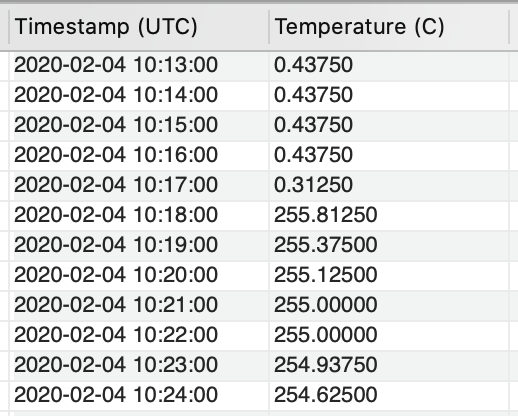
One pattern should jump out at you immediately. As air temperatures go to, and drop below freezing (0°C), the sensor readings on the Raspberry Pi go haywire. It is also important to note here that this does not rule out an electrical problem causing the problem. To strengthen our case, let’s query the sensor database to see if the sensor recorded any temperatures below freezing. We want to see no instances of the sensor recording temperatures below freezing.
We can now say with 100% certainty that something happens when the temperature hits freezing. However, we still don’t know what. To fully rule out an electrical issue causing the problem, it’s time to get on Google and research how the sensor works.
Can We Fully Rule Out an Electrical Issue Between the Raspberry Pi and the Sensor?
According to the manufacturer, there are three pieces of information that will help us here.
- The sensor reads and transmits raw data in hexadecimal format.
- In traditional decimals (such as 0.625), each element of the decimal can store values from 0 to 9. Those values are represented by the corresponding numerals.
- In hexadecimal format, each element of the decimal can store values from 0 to 15. Those values are represented by the numbers 0 to 9 and the letters A to F.
- Python uses standard mathematics to convert between hexadecimal and traditional decimal formats and vice versa.
- Because of the way hexadecimal format works, the sensors cannot handle signed (i.e. negative) values in their raw format.
- The sensors come with a software module that converts the raw hexadecimal data to a “human-readable” decimal temperature, in Celsius.
The Problem Lies with How Digital Sensors Handle Negative Values
To finally be able to rule out an electrical problem, let’s focus on item #2. The sensors not being able to handle signed (negative) values in their raw format. With any kind of digital sensor, if it gets a reading that’s off the scale, it loops around to the opposite end of the scale.
For example, if a sensor had a scale of 0 to 400 and got a reading of -1, it would output a value of 399. A reading of -5 would output 395. It works on the other end of the scale, too. A reading of 410 would output a value of 10. During my meteorology studies at the University of Oklahoma, we routinely observed this phenomenon while measuring wind speeds inside of tornadoes with doppler radar.
Item #2 is such a key piece of the puzzle because the problem occurs as soon as temperatures drop below 0°C. With this information, we can firmly establish the bottom end of the temperature sensor’s scale. Now all we had to do was figure out what the top of that scale was. For that, we have to look at the Python code, in which I found the following equation:
raw_temperature = ((raw_temperature_msb * 256) + (raw_temperature_lsb & 0xF0)) / 16In this line of code, Python converts the raw temperature reading to standard decimal. Python reads in the sensor’s raw hexadecimal readings bit-by-bit before converting them to Celsius and sending the to the Raspberry Pi. Each reading from the sensor contains a maximum of 2 bits. For example, if this formula was used on a standard Base 10 number, such as 27, it would be read as:
temperature = (10 * 2) + (1 * 7) = 20 + 7 = 27Calculating the Sensor’s Upper Bound
While that information may not seem significant on its own, it gives us enough information to calculate the upper end of the sensor’s temperature scale. Remember in hexadecimal, each bit can contain a value up to 16, so calculating the upper bound (in degrees Celsius) is simply:
Upper Bound = 16 * 16 = 256
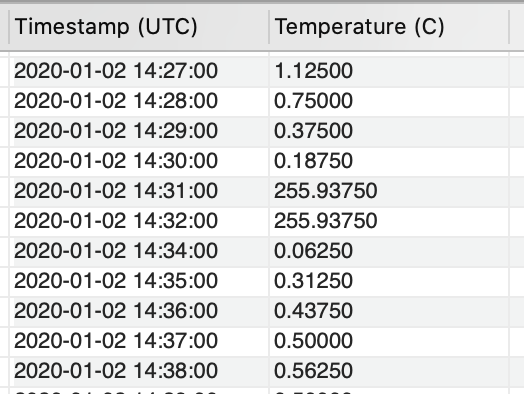
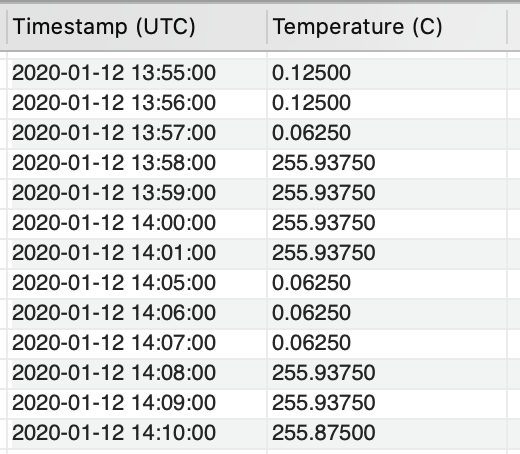
Now that we have established that the sensor has a raw output range of 0 to 256°C, let’s look back at the query results. Keep in mind what I mentioned above about off-the-scale readings looping around to the other end of the scale.
What is the Actual Temperature of the Elevated Sensor Readings
To calculate the actual temperature, simply subtract 256 from the sensor readings in the 250’s. For example, if you look at the last entry in the above table, the actual temperature would be:
Actual Temp = 254.625 – 256 = -1.375°C
Using the above query as an example, the correct actual temperatures using the loop-around equation would be:
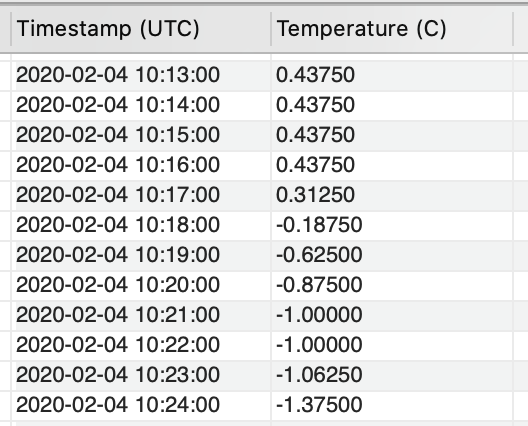
Implementing the fix before the sensor readings even reaches the QA/QC algorithm on the Raspberry Pi is simple. We simply need to add an if statement to the Python code that converts the raw hexadecimal sensor readings to degrees Celsius. Here is the original code:
try:
    raw_temperature = ((raw_temperature_msb * 256) + (raw_temperature_lsb & 0xF0)) / 16
    unrounded_temperature = raw_temperature / 16
except:
    raw_temperature = None
    unrounded_temperature = None
With the if statement added to fix the problem, the above block of code simply becomes:
try:
    raw_temperature = ((raw_temperature_msb * 256) + (raw_temperature_lsb & 0xF0)) / 16
    unrounded_temperature = raw_temperature / 16
    if unrounded_temperature > 70:
        unrounded_temperature -= 256
except:
    raw_temperature = None
    unrounded_temperature = None
Maintain Data Integrity
The final piece of the puzzle is to update the bad data points in the database to ensure data integrity. Amazingly, we can do that with a simple UPDATE command so we don’t lose any data. Full disclosure, this is not the actual database structure in the weather station. It’s just worded that way to make it easier to understand.
UPDATE `sensor_measurement`
SET `measurement_value` = `measurement_value` - 256
WHERE `measurement_type` = 'temperature'
AND `measurement_value` >= 70;
Well, this has certainly been an interesting one. It’s always a relief to confirm that the sensor is functioning exactly as it should and the problem is nothing more than an easy-to-fix bug in the Python code on the Raspberry Pi. Until next time.